
| Version 24 (modified by , 8 years ago) ( diff ) |
|---|
SB2
Table of Contents
Each node in Sandbox 2 (SB2) has a USRP X310 (with 2 UBX-160 daughtercards) directly connected to it via a 10G ethernet link. This link shows up as eth2 on the nodes.
Sandbox 2 also has a pair of 60 GHz 16+16 IEEE802.11ad beamforming transceivers available for optional connection to the X310 frontends.
RF Connections
The RF connections of the X310's in this sandbox can be configured in one of two topologies.
The first topology has both X310's interconnected via coax cables as follows with 30dB of attenuation between each TX/RX & RX2 link for protection. This setup is designed to facilitate FDD dependent experiments.
Configuration 1 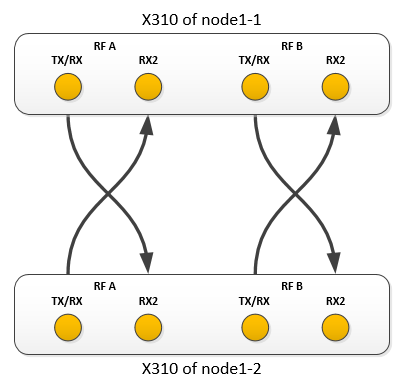

The second topology is for use of the 60 GHz transceivers. In the currently available configuration, the X310 of node1-1 can acts as a transmit-only radio, while the X310 of node1-2 acts as a receive-only radio.
Configuration 2 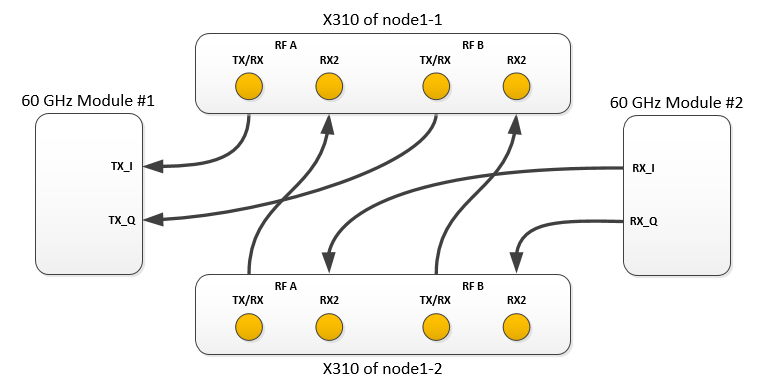

Selecting RF topology configuration
Use the instrumentation service to check the current configuration as well as make changes to it.
To get the current configuration:
Usage:
<service name="statusSB2">
  <info>This service outputs status information about SB2.</info>
</service>
Example:
curl "internal2dmz.orbit-lab.org:5054/instr/statusSB2"
Response:
<response detail="undefined local variable or method `matrixstatus' for InstrService:Class" status="ERROR" switch="OK">
  <action name="statusSB2" service="instr">
    <Switches>
      <Switch state="1" status="OK" swNo="1"/>
      <Switch state="1" status="OK" swNo="2"/>
      <Switch state="1" status="OK" swNo="3"/>
      <Switch state="1" status="OK" swNo="4"/>
    </Switches>
  </action>
</response>
To switch the configuration:
Usage:
<service name="selDeviceSB2">
  <info>
    This service configures how devices are connected in Sandbox 2.
  </info>
  <args>
    <arg isRequired="true" name="device" value="device">
      <info>
        Device (1 => X310 to X310, 2 => X310 to 60GHz module
      </info>
    </arg>
  </args>
</service>
Example (switch to normal X310 ⇔ X310 connection):
curl "internal2dmz.orbit-lab.org:5054/instr/selDeviceSB2?device=1"
Response:
<response status="OK">
  <action name="selDeviceSB2" service="instr">
    <attributes>
      <UNKNOWN ip="10.3.0.36" port="1" return="0" status="OK" switch="1"/>
      <UNKNOWN ip="10.3.0.36" port="1" return="0" status="OK" switch="2"/>
      <UNKNOWN ip="10.3.0.36" port="1" return="0" status="OK" switch="3"/>
      <UNKNOWN ip="10.3.0.36" port="1" return="0" status="OK" switch="4"/>
    </attributes>
  </action>
</response>
Networking Setup (eth2)
Each X310 is connected to its respective node through a 10G interface adapter installed in Port 1 of the USRP. In this configuration, the X310 will have a default IP address of 192.168.40.2 (see X310 User Manual). To setup network connectivity, make sure eth2 is configured with an address in the 192.168.40.0/24 subnet .
Using images based on baselines before June 12, 2017
Images built using baselines prior to June 12, 2017 may not work correctly. After imaging, the node may not be accessible via SSH or the ethernet interface order will be wrong due to the add-on NIC (for X310 connectivity) changing the order of the ethernet interfaces (making the USRP inaccessible). To repair your image, connect to the node (if SSH isn't working, connect via the CM serial console) and run the following commands.
if ! grep -i "blacklist mlx4_core" /etc/modprobe.d/blacklist.conf; then echo "blacklist mlx4_core" >> /etc/modprobe.d/blacklist.conf; fi

if ! grep -i "mlx4_core" /etc/modules; then echo "mlx4_core" >> /etc/modules; fi

depmod -a

update-initramfs -u

reboot