
| Version 110 (modified by , 3 years ago) ( diff ) |
|---|
Table of Contents
How to get started
First, you will need an ORBIT account. Please check the usage policy if you are eligible. Typically, in order to get an account, one would have to register for a user account and get it approved by the PI in charge of the project/institution they wish to be part of. If the particular institution is not available on the user account registration page, the appropriate PI can register for an institutional account.
IMPORTANT: Once you have an account, configure your ssh client to use key based authentication.
Note: this demo shows the basic use of the testbed, i.e. how to provision resources using the orbit management framework, and how to use the resources for your experiment. The example "experiment" is an extended exercise meant to demonstrate some of the skills useful in using the testbed. Users who are already comfortable with a linux command line environment can skip this step. These instructions assume basic familiarity with a command line environment. If you are feeling lost, this tutorial is a good place to start.
Six Steps
A typical experiment requires the following six steps:
1. Create a resource reservation
The user needs a set of nodes/resources from a domain to run the experiment on.
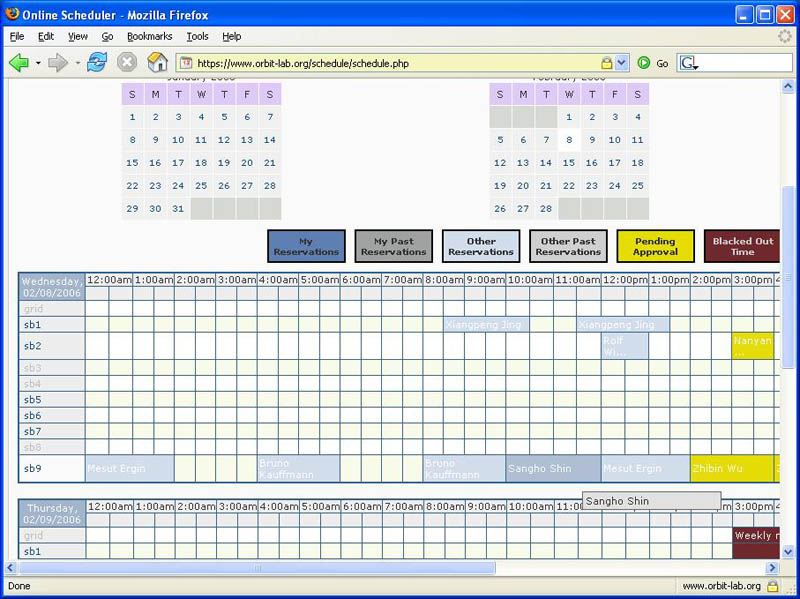
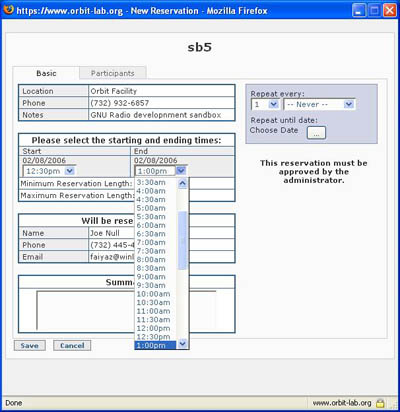
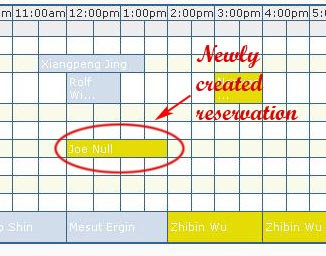
Creating a Reservation
Before you can access the testbed, you need to make a reservation for a particular domain and get it approved by the reservation service.
First time users are highly encouraged to reserve time on a sandbox instead of the main grid, and start with the provided "Hello World" experiment.
For the rest of this tutorial we will assume that the reservation was made for the sb1 domain.
2. Login into reserved domain
After you receive the reservation confirmation email, you can access the reserved domain by SSH'ing to the corresponding domain console.
Login into your reserved domain
During your approved time slot, you will be able to ssh into the console of the respective domain. A console is a dedicated machine that allows access to all resources in that domain. The console is not meant to be a part of your experiment. You will not be able to install software or change system settings.
For example, to access the sandbox 1 console:
yourhost>ssh username@console.sb1.orbit-lab.org

                              Welcome to
    ___  ____  ____ ___ _____     _        _    ____
   / _ \|  _ \| __ )_ _|_   _|   | |      / \  | __ )  ___  _ __ __ _
  | | | | |_) |  _ \| |  | |_____| |     / _ \ |  _ \ / _ \| '__/ _` |
  | |_| |  _ <| |_) | |  | |_____| |___ / ___ \| |_) | (_) | | | (_| |
   \___/|_| \_\____/___| |_|     |_____/_/   \_\____(_)___/|_|  \__, |
                                                                |___/

 Hostname : console.sb1.orbit-lab.org
 OS       : Ubuntu 16.04.7 LTS 4.15.0-142-generic x86_64
 CPU      : 1 x Intel Xeon Processor (Skylake)
            Total of 6 cores, 6 threads
 Load Avg : 0.00 (1min), 0.00 5(min), 0.00 (15min)
 Memory   : 2.9G (Free) / 3.9G (Total)
 Uptime   : up 1 day, 19 hours, 13 minutes
 Users    : 1

Last login: Wed Jan 1 12:00:00 2020 from XX.XX.XX.XX
username@console:~$
3. Load an image onto the nodes
Prior to executing the "Hello World" experiment, users need to install a system image on the hard disks of the nodes. For this tutorial we will use baseline20.04.ndz. This image is built on top of Ubuntu 20.04, and is pre-configured with a minimal set of required software so that experimenters can customize it for their needs. For information about the contents of baseline images, check here: software / hardware. The imaging process will turn the nodes off after completing imaging.
Load an Image
- Before we begin using the nodes, it's a good idea to check their status first. This is done with the omf stat command.
omf stat
This omf command is used to display the power status of the node/domain.
Usage: omf stat
username@consoles.outdoor:omf stat
Returns the status of the nodes in a testbed
Usage:
      omf-5.4 stat [-h] [-s] [-t TOPOLOGY] [-c AGGREGATE]

      With:
      -h, --help                print this help message
      -s, --summary             print a summary of the node status for the testbed
      -c, --config AGGREGATE    use testbed AGGREGATE
      -t, --topology TOPOLOGY   a valid topology file or description (defaults to 'system:topo:all')

      Some Examples:
                    omf-5.4 stat
                    omf-5.4 stat -s
                    omf-5.4 stat -t omf.nicta.node1,omf.nicta.node2 -c sb1
                    omf-5.4 stat -t system:topo:all -c grid
Individual nodes are identified in the output of stat command by their fully qualified domain name (FQDN). This establishes their "coordinates" and the "domain" to which they belong. Nodes in different domains typically can NOT see each other. Node can be in 1 of 3 states:
POWEROFF Node is Available for use but turned off POWERON Node is Available and is on NOT REGISTERED Node is not Available for use
Example: omf stat on the outdoor domain
user@console.outdoor:~# omf stat -t all

 INFO NodeHandler: OMF Experiment Controller 5.4 (git 6d34264)
 INFO NodeHandler: Slice ID: default_slice (default)
 INFO NodeHandler: Experiment ID: default_slice-2012-10-14t14.42.15-04.00
 INFO NodeHandler: Message authentication is disabled
 INFO Experiment: load system:exp:stdlib
 INFO property.resetDelay: value = 210 (Fixnum)
 INFO property.resetTries: value = 1 (Fixnum)
 INFO Experiment: load system:exp:eventlib
 INFO Experiment: load system:exp:stat
 INFO Topology: Loading topology ''.
 INFO property.nodes: value = "system:topo:all" (String)
 INFO property.summary: value = false (FalseClass)
 INFO Topology: Loading topology 'system:topo:all'.
 Talking to the CMC service, please wait
-----------------------------------------------
 Domain: outdoor.orbit-lab.org
 Node: node3-6.outdoor.orbit-lab.org   	 State: NOT REGISTERED
 Node: node3-3.outdoor.orbit-lab.org   	 State: POWEROFF
 Node: node2-10.outdoor.orbit-lab.org    State: POWEROFF
 Node: node1-10.outdoor.orbit-lab.org    State: POWEROFF
 Node: node1-8.outdoor.orbit-lab.org   	 State: POWERON
 Node: node1-6.outdoor.orbit-lab.org   	 State: POWERON
 Node: node3-2.outdoor.orbit-lab.org   	 State: POWEROFF
 Node: node3-1.outdoor.orbit-lab.org   	 State: POWEROFF
 Node: node1-3.outdoor.orbit-lab.org   	 State: POWERON
 Node: node3-5.outdoor.orbit-lab.org   	 State: POWEROFF
 Node: node2-5.outdoor.orbit-lab.org   	 State: NOT REGISTERED
 Node: node1-2.outdoor.orbit-lab.org   	 State: POWERON
-----------------------------------------------
 INFO Experiment: Switching ON resources which are OFF
 INFO EXPERIMENT_DONE: Event triggered. Starting the associated tasks.
 INFO NodeHandler:
 INFO NodeHandler: Shutting down experiment, please wait...
 INFO NodeHandler:
 INFO run: Experiment default_slice-2012-10-14t14.42.15-04.00 finished after 0:6
- It is recommended that the node be in the POWEROFF state prior to any experiment process. If the node is in the POWERON state you can use the omf tell command to get the node into the off state.
omf tell
OMF command to control the power state/reset the nodes.
Usage: omf tell
user@console:omf tell
Switch ON/OFF and reboot the nodes in a testbed
Usage:
      omf tell [-h] -t TOPOLOGY -a ACTION [-c AGGREGATE]

      With:
      -h, --help           print this help message

      -a, --action ACTION  specify an action
      ACTION:
      on              turn node(s) ON
      offs            turn node(s) OFF (soft)
      offh            turn node(s) OFF (hard)
      reboot          reboots node(s) (soft)
      reset           resets node(s) (hard)

      -h, --help                print this help message
      -t, --topology TOPOLOGY   a valid topology file or description (MANDATORY)
      -c, --config AGGREGATE    use testbed AGGREGATE

      Some Examples:
                    omf tell -a reset -t node1-1.grid.orbit-lab.org
                    omf tell -a on -t system:topo:all -c grid
                    omf tell -a reboot -t node1-1
                    omf tell -a offh -t [1..2,1..5]
                    omf tell -a offh -t system:topo:all
                    omf tell -a reset -t system:topo:imaged
The commands are: on, offh (equivalent to pulling out the power cord), offs (software shutdown), reboot (software reboot) and reset (hardware reset).
Example: turn off node1-1 on the outdoor domain
user@console.outdoor:~# omf tell -a offh -t node1-1

 INFO NodeHandler: OMF Experiment Controller 5.4 (git 3fb37b9)
 INFO NodeHandler: Reading configuration file /etc/omf-expctl-5.4/services.yaml
 INFO NodeHandler: Add domain http - http://internal1.orbit-lab.org:5054/
 INFO NodeHandler: Add domain http - http://repository1.orbit-lab.org:5054/
 INFO NodeHandler: Slice ID: default_slice (default)
 INFO NodeHandler: Experiment ID: default_slice-2014-09-30t00.24.28.504-04.00
 INFO NodeHandler: Message authentication is disabled
 INFO Experiment: load system:exp:stdlib
 INFO property.resetDelay: resetDelay = 230 (Fixnum)
 INFO property.resetTries: resetTries = 1 (Fixnum)
 INFO Experiment: load system:exp:eventlib
 INFO Experiment: load system:exp:winlib
 INFO Experiment: load system:exp:tell
 INFO property.nodes: nodes = "node1-1" (String)
 INFO property.command: command = "offh" (String)

Talking to the CMC service, please wait
-----------------------------------------------
 Node: node1-1.outdoor.orbit-lab.org   	 Reply: OK
-----------------------------------------------

 INFO EXPERIMENT_DONE: Event triggered. Starting the associated tasks.
 INFO NodeHandler:
 INFO NodeHandler: Shutting down experiment, please wait...
 INFO NodeHandler:
 INFO run: Experiment default_slice-2014-09-30t00.24.28.504-04.00 finished after 0:10
- Once node set is on an POWEROFF state, load an image with omf load command
omf load
Load command is used to put an image onto the hard disk of the node.
Usage: omf load
Install a given disk image on the nodes in a testbed
Usage:
      omf-5.4 load [-h] [-i IMAGE_PATH] [-o TIMEOUT] [-t TOPOLOGY] [-c AGGREGATE]

      With:
      -h, --help                print this help message
      -c, --config AGGREGATE    use testbed AGGREGATE
      -t, --topology TOPOLOGY   a valid topology file or description (defaults to 'system:topo:all')
                                (if a file 'TOPOLOGY' doesn't exist, interpret it as a comma-separated list of nodes)
      -i, --image IMAGE         disk image to load
                                (default is 'baseline.ndz', the latest stable baseline image)
      -o, --timeout TIMEOUT     a duration (in sec.) after which imageNodes should stop waiting for
                                nodes that have not finished their image installation
                                (default is 800 sec, i.e. 13min 20sec)
          --outpath PATH        Path where the resulting Topologies should be saved
                                (default is '/tmp')
          --outprefix PREFIX    Prefix to use for naming the resulting Topologies
                                (default is your experiment ID)

      Some Examples:
                    omf-5.4 load
                    omf-5.4 load -t system:topo:all -i baseline-2.4.ndz
                    omf-5.4 load -t omf.nicta.node1 -i wireless-2.6.ndz
                    omf-5.4 load -t omf.nicta.node1,omf.nicta.node2 -i baseline.ndz -o 400
                    omf-5.4 load -t system:topo:circle -i my_Own_Image.ndz
                    omf-5.4 load -t my_Own_Topology -i baseline-2.2.ndz -t 600 -c grid
                    omf-5.4 load -t my_Own_Topology --outpath ./ --outprefix my_Own_Prefix
Two important arguments are TOPOLOGY describing the set of nodes one wishes to image , and !IMAGE specifying the name of the image one wants to load the nodes with. If the imaging process does not does not finish within the default timeout period, that period can be increase by using the -o flag (e.g. -o 1600). Typical command to load both nodes of sandbox 1 with the baseline image would look like:
If the node is in the NOT REGISTERED state, you may need to wait for it to recover the POWEROFF state (it some times requires a few moments for the services to sync up). If the node takes more than 60 seconds to come out of the NODE NOT AVAILABLE state please report it to an administrator.Example: omf load-i baseline.ndz -t node1-1
username@console.sb3:~$ omf load -i baseline.ndz -t node1-1

DEBUG FQDN:console.sb3.orbit-lab.org:
 INFO NodeHandler: OMF Experiment Controller 5.4 (git 861d645)
 INFO NodeHandler: Reading configuration file /etc/omf-expctl-5.4/services.yaml
 INFO NodeHandler: Add domain http - http://internal1.orbit-lab.org:5054/
 INFO NodeHandler: Add domain http - http://repository1.orbit-lab.org:5054/
 INFO NodeHandler: Add domain http - http://external1.orbit-lab.org:5054/
 INFO NodeHandler: Slice ID: pxe_slice
 INFO NodeHandler: Experiment ID: pxe_slice-2018-08-08t13.41.37.814-04.00
 INFO NodeHandler: Message authentication is disabled
 INFO Experiment: load system:exp:stdlib
 INFO property.resetDelay: resetDelay = 230 (Fixnum)
 INFO property.resetTries: resetTries = 1 (Fixnum)
 INFO Experiment: load system:exp:eventlib
 INFO Experiment: load system:exp:winlib
 INFO Experiment: load system:exp:imageNode
 INFO property.nodes: nodes = "node1-1" (String)
 INFO property.image: image = "baseline.ndz" (String)
 INFO property.domain: domain = "sb3.orbit-lab.org" (String)
 INFO property.outpath: outpath = "/tmp" (String)
 INFO property.outprefix: outprefix = "pxe_slice-2018-08-08t13.41.37.814-04.00" (String)
 INFO property.timeout: timeout = 800 (Fixnum)
 INFO property.resize: resize = nil (NilClass)
 INFO Topology: Loaded topology 'system:topo:registered'.
 INFO property.resetDelay: resetDelay = 100 (Fixnum)
 INFO Experiment: Resetting resources
 INFO stdlib: Waiting for nodes (Up/Down/Total): 0/1/1 - (still down: node1-1.sb3.orbit-lab.org) [0 sec.]
 INFO stdlib: Waiting for nodes (Up/Down/Total): 0/1/1 - (still down: node1-1.sb3.orbit-lab.org) [10 sec.]
 INFO stdlib: Waiting for nodes (Up/Down/Total): 0/1/1 - (still down: node1-1.sb3.orbit-lab.org) [20 sec.]
 INFO stdlib: Waiting for nodes (Up/Down/Total): 0/1/1 - (still down: node1-1.sb3.orbit-lab.org) [30 sec.]
 INFO stdlib: Waiting for nodes (Up/Down/Total): 0/1/1 - (still down: node1-1.sb3.orbit-lab.org) [40 sec.]
 INFO stdlib: Waiting for nodes (Up/Down/Total): 0/1/1 - (still down: node1-1.sb3.orbit-lab.org) [50 sec.]
 INFO exp: Progress(0/0/1): 0/0/0 min(node1-1.sb3.orbit-lab.org)/avg/max (59) - Timeout: 790 sec.
 INFO ALL_UP: Event triggered. Starting the associated tasks.
 INFO BRING_UP: Event triggered. Starting the associated tasks.
 INFO Experiment: Bringing up resources
 INFO exp: Progress(0/0/1): 50/50/50 min(node1-1.sb3.orbit-lab.org)/avg/max (59) - Timeout: 780 sec.
 INFO exp: Progress(0/0/1): 80/80/80 min(node1-1.sb3.orbit-lab.org)/avg/max (59) - Timeout: 770 sec.
 INFO exp: Progress(1/0/1): 100/100/100 min()/avg/max (59) - Timeout: 760 sec.
 INFO exp:  -----------------------------
 INFO exp:  Imaging Process Done
 INFO exp:  1 node successfully imaged - Topology saved in '/tmp/pxe_slice-2018-08-08t13.41.37.814-04.00-topo-success.rb'
 INFO exp:  -----------------------------
 INFO EXPERIMENT_DONE: Event triggered. Starting the associated tasks.
 INFO NodeHandler:
 INFO NodeHandler: Shutting down experiment, please wait...
 INFO NodeHandler:
 INFO NodeHandler: Shutdown flag is set - Turning Off the resources
 INFO run: Experiment pxe_slice-2018-08-08t13.41.37.814-04.00 finished after 1:44
Provision SB1 nodes
So, for our experiment on sb1, run the following:
  username@console:~$ omf stat -t all
  username@console:~$ omf tell -t all -a offh
  username@console:~$ omf load -t all -i baseline20.04.ndz
We are using
allfor our set of nodes here because there are only two nodes in sb1. For a larger domain like grid, you should specify a list of specific nodes, likenode1-1,node2-1,node8-8. Do not turn on all of the nodes in grid!
4. Turn the nodes on
At this point the nodes' disks are imaged with the baseline image and need to be turned back on before proceeding. Use the
omf tellcommand to turn the nodes on and give them a couple of minutes to boot, then check their status withomf stat.
5. Run your experiment
In this example, our "experiment" will be to use one node as a wireless access point, which the other node will connect to. This is meant to demonstrate the basic way in which experimenters interact with testbed resources, along with some basic skills which will be useful during your use of the testbed.
Preliminary steps
- First, we need to ssh from the console to the node. You will operate as the root user on the nodes, so run
ssh root@node1-1to connect to node1-1, for example. You may want to open a second terminal with another connection to console.sb1.orbit-lab.org so that you can simultaneously ssh to node1-2 and run these commands in parallel.
Before we set up the access point, we want to make sure that the wireless interfaces on both nodes are on. By default, wireless interfaces on ORBIT nodes are disabled to reduce RF noise for experiments. On both nodes, run
ip ato list the current network interfaces. You should see something like1: lo: <LOOPBACK,UP,LOWER_UP> mtu 65536 qdisc noqueue state UNKNOWN group default qlen 1000 link/loopback 00:00:00:00:00:00 brd 00:00:00:00:00:00 inet 127.0.0.1/8 scope host lo valid_lft forever preferred_lft forever inet6 ::1/128 scope host valid_lft forever preferred_lft forever 2: DATA1: <BROADCAST,MULTICAST,UP,LOWER_UP> mtu 1500 qdisc fq_codel state UP group default qlen 1000 link/ether 70:8b:cd:bc:82:8d brd ff:ff:ff:ff:ff:ff inet6 fe80::728b:cdff:febc:828d/64 scope link valid_lft forever preferred_lft forever 3: CTRL: <BROADCAST,MULTICAST,UP,LOWER_UP> mtu 1500 qdisc fq_codel state UP group default qlen 1000 link/ether 70:8b:cd:bc:82:8c brd ff:ff:ff:ff:ff:ff inet 10.11.1.1/16 brd 10.11.255.255 scope global dynamic CTRL valid_lft 5170sec preferred_lft 5170sec inet6 fe80::728b:cdff:febc:828c/64 scope link valid_lft forever preferred_lft foreverThese are the default wired interfaces available on all ORBIT nodes: CTRL is the interface that is used to connect to the nodes from the console. It is also the interface over which internet traffic is routed. Note: be very careful when modifying the CTRL interface— you may make your node inaccessible over ssh.
You can also see the DATA interface. This interface is meant to be configured as part of experiments, which is why it does not have an IP address.
If we run
iw listto list wireless interfaces, we should see that there are currently no wireless interfaces. First we must check what wireless devices are present to determine which driver module to load. Runlshw -c networkto list network devices available on the node. You should see in the output that there is an AR928X wireless network card. For this particular card, we need to run the following to load the proper driver:modprobe ath9k.
Now, we should be able to see the wireless interface in the output of the
ipandiwcommands:1: lo: <LOOPBACK,UP,LOWER_UP> mtu 65536 qdisc noqueue state UNKNOWN group default qlen 1000 link/loopback 00:00:00:00:00:00 brd 00:00:00:00:00:00 inet 127.0.0.1/8 scope host lo valid_lft forever preferred_lft forever inet6 ::1/128 scope host valid_lft forever preferred_lft forever 2: DATA1: <BROADCAST,MULTICAST,UP,LOWER_UP> mtu 1500 qdisc fq_codel state UP group default qlen 1000 link/ether 70:8b:cd:bc:82:8d brd ff:ff:ff:ff:ff:ff inet6 fe80::728b:cdff:febc:828d/64 scope link valid_lft forever preferred_lft forever 3: CTRL: <BROADCAST,MULTICAST,UP,LOWER_UP> mtu 1500 qdisc fq_codel state UP group default qlen 1000 link/ether 70:8b:cd:bc:82:8c brd ff:ff:ff:ff:ff:ff inet 10.11.1.1/16 brd 10.11.255.255 scope global dynamic CTRL valid_lft 6797sec preferred_lft 6797sec inet6 fe80::728b:cdff:febc:828c/64 scope link valid_lft forever preferred_lft forever 4: wlp3s0: <BROADCAST,MULTICAST> mtu 1500 qdisc noop state DOWN group default qlen 1000 link/ether 00:15:6d:84:3f:20 brd ff:ff:ff:ff:ff:ff
Make sure you have enabled the wireless interface on both nodes in the sandbox. Now, use the
ipcommand to bring up the new wireless interface:root@node1-1:~# ip link set wlp3s0 upThe interface is now running, but it isn't connected to any networks. We can use either node to scan for the available networks, to ensure that we don't start a new network with the same ssid as an existing one. Running
iw dev wlp3s0 scanwill print out all available information about all available networks (make sure to substitute in the name of your wireless interface if it is different). To find the exact information we're looking for, we can use the grep utility:iw dev wlp3s0 scan | grep SSID. Grep has many capabilities, but we can see it's simplest use case here: it outputs lines containing a search string. We have also taken advantage of the pipe utility provided by the linux command line to feed the output of one command into another.
Set up Access Point
We will use node1-1 as the access point.
- Before we install anything, we need to get an updated list of the available software by running
apt update. Now install hostapd and dnsmasq on node1-1:root@node1-1:~# apt install hostapd dnsmasq
You'll see some error messages because dnsmasq is unable to start automatically. That's ok for now.
- Now we need to configure the services we just installed. We'll start with hostapd, the service that creates the access point. Open a file called
hostapd.confin/etc/hostapd/using your editor of choice. Nano is a good option for beginners:root@node1-1:~# nano /etc/hostapd/hostapd.conf
Note the commands listed at the bottom of the nano interface, especially exit and write out (save to file). The^in the command stands for control. So to save your changes and exit, you would press CTRL+O then CTRL+X.
Enter the following into the new file, making sure to change the first line if your wireless interface has a different name:
interface=wlp3s0
logger_syslog=-1
logger_syslog_level=2
logger_stdout=-1
logger_stdout_level=2
ctrl_interface=/var/run/hostapd
ctrl_interface_group=0
ssid=hello-wireless
hw_mode=g
channel=1
beacon_int=100
dtim_period=2
max_num_sta=20
rts_threshold=-1
fragm_threshold=-1
auth_algs=1
ignore_broadcast_ssid=0
wpa=2
wpa_passphrase=t0pS3cr3t
wpa_key_mgmt=WPA-PSK
wpa_pairwise=CCMP
These parameters are mostly default values, but note in particular the ssid name and passphrase. We will need these to connect to the network. For an explanation of what these parameters do, you can read the example file
/usr/share/doc/hostapd/examples/hostapd.conf.
- Now we will set up the configuration for dnsmasq, which is used to provide ip addresses to clients that connect to the access point. A configuration file already exists at /etc/dnsmasq.conf, although it doesn't have any configuration to start. Open the file to add the following lines:
  bogus-priv
  bind-interfaces
  listen-address=192.168.100.1
  dhcp-range=192.168.100.50,192.168.100.150,2h
This is a very minimal configuration, but it should be all we need.
- You can see we're telling dnsmasq to listen on the ip address 192.168.100.1, but we haven't put that address on our wireless interface yet. We can do that with the following command:
root@node1-1:~# ip addr add 192.168.100.1/24 dev wlp3s0
- Now we can start the services. We have to first enable hostapd, which is disabled after you first install it.
  root@node1-1:~# systemctl unmask hostapd.service
  root@node1-1:~# systemctl start hostapd.service
  root@node1-1:~# systemctl start dnsmasq.service
Connect to Access Point
- First, verify that you can see the "hello-wireless" network from node1-2 by running the prior command to scan for interfaces and grepping for SSID.
- We'll use a utility called wpa_supplicant to connect to the access point. After running
apt update, run the following to install it:root@node1-2:~# apt install wpasupplicant
- To set up wpa_supplicant to connect to "hello-wireless", we'll use its built-in utility to modify the configuration file:
root@node1-2:~# wpa_passphrase "hello-wireless" "t0pS3cr3t" > /etc/wpa_supplicant.conf
- Now we can connect to the network:
root@node1-2:~# wpa_supplicant -B -i wlp3s0 -c /etc/wpa_supplicant.conf
- We need to manually request an ip address after connecting:
root@node1-2:~# dhclient wlp3s0
- Verify that you can see an ip address in the 192.168.100.X ip space on the wireless interface. You should also be able to use the ping utility to test connectivity to node1-1 over the wireless interface:
root@node1-2:~# ping 192.169.100.1
- As a final test , we can bring down the wired interfaces on node1-2 and ssh to it from node1-1 over the wireless network. Use the ip command to turn off first DATA1, then CTRL. You'll use the same command you used to bring the interfaces up,
except now you'll use
downinstead ofup. Make sure to use the correct interface names. After you bring down CTRL, your ssh connection will become unresponsive.
Now, from node1-1, ssh to root at the ip address that node1-2 had on the wireless interface. From there, you can bring the interfaces back up. This concludes the demo experiment.
6. (optionally) Save the node image
After you have invested time in customizing one of the baseline images for your experiment, you may want to save your work as a custom image for you to start with during your next reservation. This must be done before the end of your time slot— saving an image can take a long time depending on the amount of additional content you have added. Make sure you budget time in your reservation to save your work.
Note that these instructions are here as a reference. There is no need to save the example experiment.
How to save your work on the node
We are using node1-1 in the Orbit sb1 domain, but the process is the same for any node in the testbed.
When you are ready to save your work, run the following command on the node. (Note that the prepare.sh script is located in the
/root/directory.)ssh root@node1-1.sb1.orbit-lab.org root@node1-1.sb1.orbit-lab.org: ./prepare.shThis command will dump log files to reduce the size of the image and remove OS configuration specific to the node to generalize the image so that it can be used on any node in the testbed.
From the console, use omf to turn off the node before saving:
username@console:~$ omf tell -t node1-1 -a offhNow use the omf save command to save the node:
omf save -n node1-1.sb1.orbit-lab.orgThe save command produces a lot of output in the console, but it is important to look through it to ensure that there were no errors in the saving process. The output from the command will also include the name of the image file that has been created. These images are stored in the
/mnt/imagesdirectory on all of the consoles. If you are planning to re-use this image frequently, you may wish to rename it. When you rename the image, please ensure that the new name starts with your username, and does not contain the word baseline.Images will be stored forever unless the owner deletes them, so please try to be respectful of our disk space— delete images when you are done with them, and try not to keep too many.
Note also that images are world readable by default. This means that by default anyone can load an image that you save. You can change this by using the
chmodcommand on the image file.
Where to go from here
If you are still unsure what Orbit is, please read the FAQ and check other tutorials.
Attachments (5)
- Schedule-howto3.jpg (128.8 KB ) - added by 14 years ago.
- Schedule-howto4.jpg (56.7 KB ) - added by 14 years ago.
- Schedule-howto5.jpg (49.3 KB ) - added by 14 years ago.
- Schedule-HowTo6.jpg (66.6 KB ) - added by 14 years ago.
-
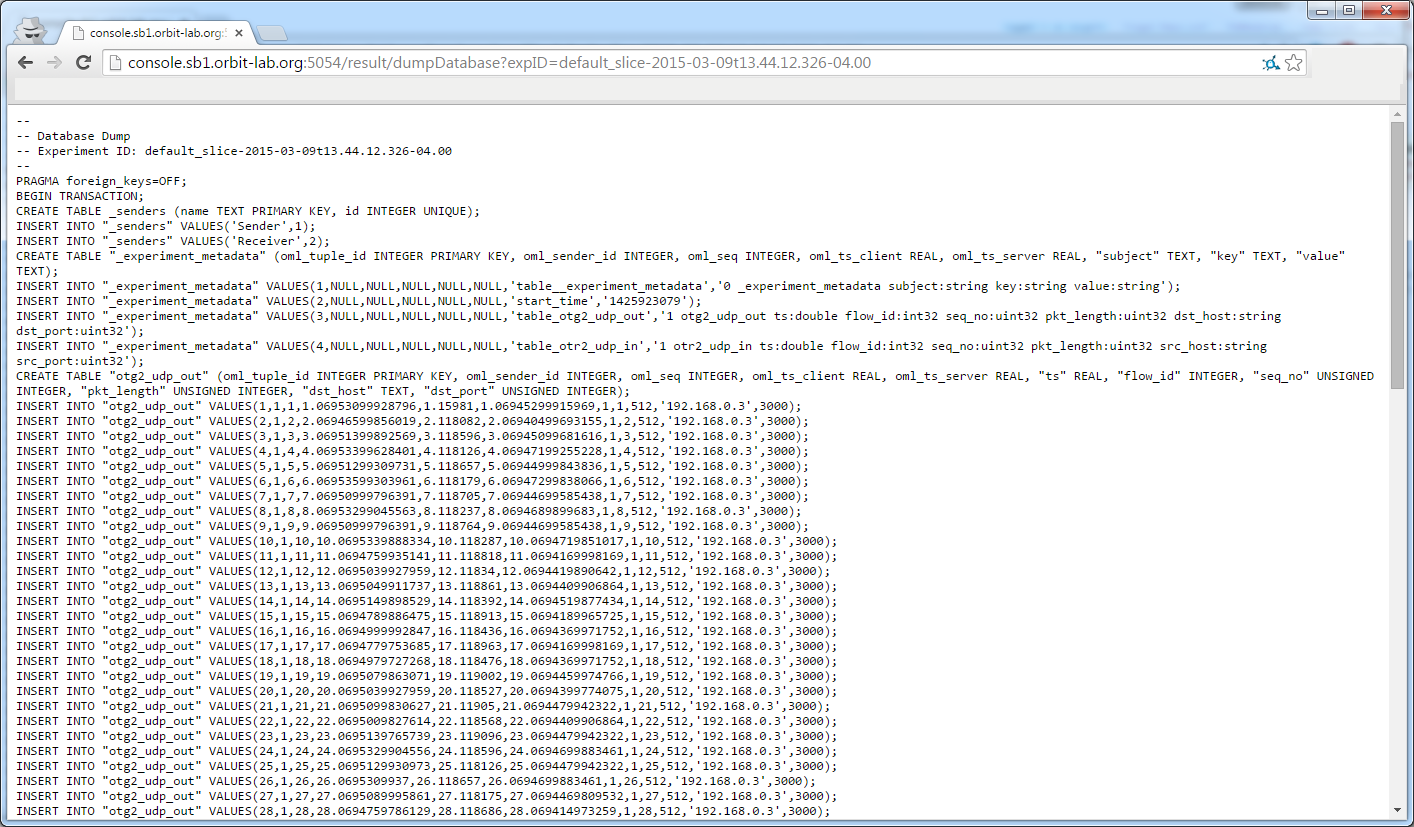
Result.png
(284.5 KB
) - added by 11 years ago.
Demo result pae
Download all attachments as: .zip