
| Version 38 (modified by , 10 years ago) ( diff ) |
|---|
Exercise 1: Simple MobilityFirst Network Deployment and Test
Table of Contents
Objective
In this exercise we will establish a simple topology consisting of MobilityFirst routers, hosts and applications, deploy the software components onto physical nodes, and run an end-to-end 'ping' application. At the end of the exercise, you should expect to acquire a general knowledge of the MobilityFirst software components and how to deploy and configure them using the Orbit testbed.
Prerequisites
This tutorial series assumes you have an ORBIT account, have scheduled a session on the ORBIT testbed, are familiar with SSH'ing into the testbed itself, and are familiar with the basics of running ORBIT experiments. If you have not done these things yet, you may wish to do so before taking a look at this slightly more advanced experiment. If you are unfamiliar with or are entirely new to ORBIT, you may wish to start here.
In addition to basic ORBIT prerequisites, the experimenters are expected to have basic networking knowledge and basic familiarity with the MobilityFirst terminology.
Topology
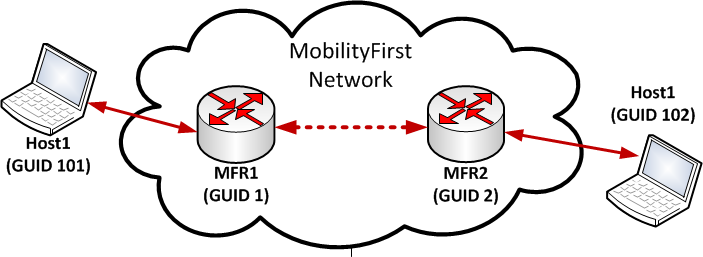
In this exercise we will use a simple linear topology consisting of two MobilityFirst routers (MFR) that interconnecting two hosts: Host1 will initiate a 'ping' communication and Host2 will respond to the ping request.

The two hosts will use WiFi to connect to the edge routers (i.e. they are considered to be "mobile").
This tutorial is assuming use of grid resources which is not a strict a requirement i.e. for the successful execution of this experiment any sandbox with at least 4 nodes could be used (i.e. sb4, sb9, etc.) Note: This tutorial won't work on SB9 without modification since SB9 nodes don't have WiFi devices.
MobilityFirst ORBIT Image
The complete set of components from the latest release of the MobilityFirst software is available as a compressed image within the ORBIT testbed for imaging nodes using the 'OMF' tool. The current pre-prepared image is built over Ubuntu 14.04 LTS distribution and will be moved to newer distributions as they become available and we have had a chance to test compatibility. This tutorial image is made under the assumption that a fixed set of VLANs is used for topology creation and will need to be modified for different execution environments.
Experiment Execution
As is the case with every ORBIT based experiment, it starts with the first four of the six step experiment lifecycle. Once your grid reservation is approved, log in into the grid console using SSH:
ssh your_user_username@console.grid.orbit-lab.org
For simplicity, open 3 simultaneous sessions on your local machine and access the grid's console with all of them; you will need them in the continuation of the exercise.
In one of the consoles we will start loading the !Mobilityfirst image into the four nodes that have been assigned to you:
omf load -i 'mf-release-latest.ndz' -t system:topo:mf-groupXX
system:topo:mf-groupXX represents the topology of 4 nodes that has been assigned to you're group and mf-groupXX has to be replaced by the group id assigned to you (i.e. 01,02,…).
For example, mf-group01 will load the image on nodes 'node20-20,node20-19,node19-19,node19-20'
If system:topo:mf-groupXX doesn't work for you, replace that part with a list of four nodes: node1-1,node1-2,node1-3,node1-4
If at the end of the execution, the final output of your console looks similar to:
INFO exp:  -----------------------------
 INFO exp:  Imaging Process Done
 INFO exp:  4 nodes successfully imaged - Topology saved in '/tmp/pxe_slice-2014-10-15t02.10.16.594-04.00-topo-success.rb'
 INFO exp:  -----------------------------
 INFO EXPERIMENT_DONE: Event triggered. Starting the associated tasks.
 INFO NodeHandler:
 INFO NodeHandler: Shutting down experiment, please wait...
 INFO NodeHandler:
 INFO NodeHandler: Shutdown flag is set - Turning Off the resources
 INFO run: Experiment pxe_slice-2014-10-15t02.10.16.594-04.00 finished after 1:50
your nodes have been imaged correctly.
Deploy Network
Software and experiment control in the ORBIT testbed can be automated greatly using the OMF framework. An OMF control script is written in Ruby and allows the experimenter to specify the set of nodes, their network configuration, to specify software components and arguments, and to control their execution on one or more nodes. We will use an OMF script to bring up 4 ORBIT nodes to host our topology, with the corresponding software components.
We will first introduce the main details of the scripts that will be run and then we will step to the execution process itself.
Software Component Specification
The following snippet shows the specification of the MobilityFirst components along with the required arguments. A typical application will have at least a brief description, a path for the associated binary to execute and a list of properties that correspond to the parameters that will be passed once starting the executable.
#Application definition of a MobilityFirst access router
defApplication('MF-Router', 'router') {|app|
    app.shortDescription = "Click-based MobilityFirst Access Router"
    app.path = "/usr/local/src/mobilityfirst/eval/orbit/tutorial/scripts/ARWrapper.sh"
    # click options
    app.defProperty('num_threads', 'number of threads', "-t",{:type => :integer, :mandatory => true, :default => 4, :order => 1})
    app.defProperty('ctrl_port', 'port for Click control socket', "-c",{:type => :integer, :order => 2})
    # click config file
    app.defProperty('config_file', 'Click configuration file', "-C",{:type => :string,:mandatory=> true})
    # keyword parameters used in click config file
    app.defProperty('my_GUID', 'router GUID', "-m",{:type => :string, :mandatory => true})
    app.defProperty('topo_file', 'path to topology file', "-f",{:type => :string, :mandatory => true})
    app.defProperty('core_dev', 'core network interface', "-d",{:type => :string,:mandatory => true})
    app.defProperty('GNRS_server_ip', 'IP of local GNRS server', "-s",{:type => :string,:mandatory => true})
    app.defProperty('GNRS_server_port', 'Port of GNRS server', "-p",{:type => :string,:mandatory => true})
    app.defProperty('GNRS_listen_ip', 'IP to listen for GNRS response', "-i",{:type => :string,:default => "0.0.0.0"})
    app.defProperty('GNRS_listen_port', 'port to listen for GNRS response', "-P",{:type => :string,:default => "10001"})
    app.defProperty('edge_dev', 'edge network interface', "-D",{:type => :string,:mandatory => true})
    app.defProperty('edge_dev_ip', 'IP assigned to edge interface', "-I",{:type => :string,:mandatory => true})
}

#Application definition of a GNRS server
defApplication('MF-GNRS', 'gnrs') {|app|
    app.shortDescription = "GNRS Server"
    app.path = "/usr/local/src/mobilityfirst/eval/orbit/tutorial/scripts/GNRSWrapper.sh"
    app.defProperty('log4j_config_file', 'log 4j configuration file', "-d",{:type => :string, :order => 1})
    app.defProperty('jar_file', 'server jar file with all dependencies', "-j" ,{:type => :string, :mandatory=> true, :default => "/usr/local/src/mobilityfirst/gnrs/jserver/target/gnrs-server-1.0.0-SNAPSHOT-jar-with-dependencies.jar", :order => 2})
    app.defProperty('config_file', 'server configuration file', "-c",{:type => :string, :mandatory=> true, :order => 3})
}


#Application definition of the client network protocol stack
defApplication('MF-HostStack', 'hoststack') {|app|
    app.shortDescription = "MF host network stack"
    app.path = "/usr/local/bin/mfstack"
    app.defProperty('log_level', 'log level', nil,{:type => :string, :mandatory => true, :order => 1, :default => "-e"}) # default is 'error'
    app.defProperty('config_file', 'stack configuration file', nil,{:type => :string, :mandatory => true, :order => 2})
}
A few considerations on the defined applications:
- As seen above, the router is configured with both 'core' (core_dev) and 'edge' (edge_dev) interfaces. Different router configurations are available depending on the required functionality. In this case we use what we call a MobilityFirst Access Router, which has the particularity of having the core interfaces connected towards the core of the network, while the edge interface enables hosts to connect and access the MobilityFirst network.
- For this basic setup, the GNRS has been configured to be running as a single server instance, but in a larger experiment, it is designed to be a distributed system deployed at different locations.
- Most of the client settings are located in a configuration file pre-loaded on the ORBIT image in the folder /usr/local/src/mobilityfirst/eval/orbit/conf/.
Setting up the Software Node Groups
The following snippet shows how the node groups for the routers are setup in the OMF control scripts. Node groups allow experimenters to use single statements to set configuration (e.g. network interfaces) and execute commands across all nodes belonging to the group.
#Create router groups
for i in 1..num_routers
        #Create a topology with a single router in it
    defTopology("topo:router_#{i}") { |t|
        aNode = routersTopo.getNodeByIndex(i-1)
        t.addNode(aNode)
        info aNode, " assigned role of router with GUID: #{i}"
    }

        #Through the group definition we set up the applications to run
    defGroup("router_#{i}", "topo:router_#{i}") {|node|
        node.addApplication('MF-Router') {|app|
            app.setProperty('num_threads', router_threads)
            app.setProperty('config_file', click_conf)
            app.setProperty('my_GUID', router_guid[i-1])
            app.setProperty('topo_file', rtr_topo_file)
            app.setProperty('core_dev', core_dev)
            app.setProperty('GNRS_server_ip', GNRS_server_ip)
            app.setProperty('GNRS_server_port', GNRS_server_port)
            app.setProperty('GNRS_listen_ip', "192.168.100.#{i}")
            app.setProperty('GNRS_listen_port', GNRS_listen_port)
            app.setProperty('edge_dev', edge_dev)
            app.setProperty('edge_dev_ip', router_ether_if_ip[i-1])
        }

      #If it is the first router add the GNRS
      if i == 1
                aNode = routersTopo.getNodeByIndex(i-1)
                info aNode, " will also host the GNRS server"
        node.addApplication('MF-GNRS') {|app|
              app.setProperty('log4j_config_file', GNRS_log_file)
              app.setProperty('jar_file', GNRS_jar_file)
              app.setProperty('config_file', GNRS_conf_file)
        }
      end

          #Setup the node interfaces
          #The first ethernet interface is used as the core interface
      node.net.e0.ip = "192.168.100.#{i}"
      node.net.e0.netmask = '255.255.255.0'

          #The first wireless interface is used to give access to clients
          node.net.w0.mode = "adhoc"
          node.net.w0.type = 'g'
          node.net.w0.channel = "11"
          node.net.w0.essid = "SSID_group_#{i}"
          node.net.w0.ip = "192.168.#{i}.1"
    }
end

#Create host groups
for i in 1..num_hosts
        #Create a topology with a single router in it
    defTopology("topo:host_#{i}") { |t|
        aNode = hostsTopo.getNodeByIndex(i-1)
        t.addNode(aNode)
        info aNode, " assigned role of client with GUID: #{100 + i}"
    }

        #Through the group definition we set up the applications to run
    defGroup("host_#{i}", "topo:host_#{i}") {|node|
        node.addApplication('MF-HostStack') {|app|
            app.setProperty('config_file', hoststack_conf_file[i-1])
            app.setProperty('log_level', log_level)
        }

          #The first wifi interface is used to connect to the Access Router
          node.net.w0.mode = "adhoc"
          node.net.w0.type = 'g'
          node.net.w0.channel = "11"
          node.net.w0.essid = "SSID_group_#{i}"
          node.net.w0.ip = "192.168.#{i}.2"
      }
end
As it can be seen above, once defining applications that each group will execute, the application properties are set accordingly. While we do not want to enter the details of each parameter, it is important to notice how by simple use of counters, the different nodes can be assigned different values.
Moreover, resources such node interfaces and their corresponding IP addresses have to be set up in this phase of the experiment. As we discussed earlier the router is configured with both edge and core interfaces. An ethernet interface is used to connect to 2 core routers, while a wireless interface is used to provide access for the clients.
Execute
Starting the MobilityFirst Components
The final part of the experiment script is dedicated to the execution events and commands. The following snippet shows the starting of the router software, the gnrs server and the client network protocol stack:
    onEvent(:ALL_UP_AND_INSTALLED) do |event|

    info "This is my first MobilityFirst experiment"

    info "Initializing resources"
    # clean up and initialize networking for routers
    for i in 1..num_routers
        # click router cleanup
        group("router_#{i}").exec("killall -9 click")
        # gnrs cleanup
        group("router_#{i}").exec("killall -9 java")
    end

    #clean up and initialize networking for hosts
    for i in 1..num_hosts
        group("host_#{i}").exec("killall -9 mfstack")
    end
    wait 20

    # bring up routers (along with gnrs servers)
    info "Bringing up routers..."
    for i in 1..num_routers
        group("router_#{i}").startApplications
    end
    wait 5

    info "Bringing up host stacks..."
    for i in 1..num_hosts
        group("host_#{i}").startApplications
    end

    info "Access the nodes to run a program"

    wait 10000

    Experiment.done
    end
To make sure, our experiment will not conflict with any prior running experiments on the node groups, all eventual residual processes are killed. After waiting for a reasonable time in order to allow the resources to reset and be ready for a new execution, first the routers are started (and the gnrs for the associated node), and then the hosts are brought up.
Turning on nodes
First of all you will first need to turn your assigned nodes on:
omf tell -a on -t system:topo:imaged
Configuring the topology
Configure VLAN interfaces on the nodes
On all nodes prepare /etc/network/interfaces and add VLAN based interfaces based on your group. The file should look like this:
auto eth0.1XX1
iface eth0.1XX1 inet static

auto eth0.1XX2
iface eth0.1XX2 inet static

auto eth0.1XX3
iface eth0.1XX3 inet static
where XX is your group number (i.e. 01,02,03,..).
Configure MF components to use appropriate VLANs
The assumption is that the routers will be using VLAN 1XX1, and clients VLANs 1XX2 and 1XX3. Edit file /usr/local/src/mobilityfirst/eval/orbit/tutorial/conf/hoststack2.conf on all four nodes to assign appropriate VLANs based on the instructions from the script.
Executing the script
All the aggregated definitions just presented are included in a single script that you have to download to your grid console. In order to download it to your console, copy and paste the following command:
wget www.winlab.rutgers.edu/~bronzino/downloads/orbit/exercise1.rb
Once the file has been downloaded, execute it with the following command:
omf exec exercise1.rb
The obtained output should resemble the following snippet:
 INFO NodeHandler: OMF Experiment Controller 5.4 (git 3fb37b9)
 INFO NodeHandler: Reading configuration file /etc/omf-expctl-5.4/services.yaml
 INFO NodeHandler: Add domain http - http://internal1.orbit-lab.org:5054/
 INFO NodeHandler: Add domain http - http://repository1.orbit-lab.org:5054/
 INFO NodeHandler: Slice ID: default_slice (default)
 INFO NodeHandler: Experiment ID: default_slice-2014-10-15t02.12.19.869-04.00
 INFO NodeHandler: Message authentication is disabled
 INFO Experiment: load system:exp:stdlib
 INFO property.resetDelay: resetDelay = 230 (Fixnum)
 INFO property.resetTries: resetTries = 1 (Fixnum)
 INFO Experiment: load system:exp:eventlib
 INFO Experiment: load system:exp:winlib
 INFO Experiment: load exercise1.rb
 INFO Topology: Loaded topology '/tmp/pxe_slice-2014-10-15t02.10.16.594-04.00-topo-success'.
 INFO Topology: Loaded topology 'system:topo:imaged'.
 INFO exp: node1-1.grid.orbit-lab.org assigned role of router with GUID: 1
 INFO exp: node1-1.grid.orbit-lab.org will also host the GNRS server
 INFO exp: node1-2.grid.orbit-lab.org assigned role of router with GUID: 2
 INFO exp: node2-1.grid.orbit-lab.org assigned role of client with GUID: 101
 INFO exp: node2-2.grid.orbit-lab.org assigned role of client with GUID: 102
 INFO exp: Definition of resources completed
 INFO stdlib: Waiting for nodes (Up/Down/Total): 0/4/4 - (still down: node1-2.grid.orbit-lab.org,node2-1.grid.orbit-lab.org,node1-1.grid.orbit-lab.org) [0 sec.]
 INFO stdlib: Waiting for nodes (Up/Down/Total): 0/4/4 - (still down: node1-2.grid.orbit-lab.org,node2-1.grid.orbit-lab.org,node1-1.grid.orbit-lab.org) [10 sec.]
 INFO stdlib: Waiting for nodes (Up/Down/Total): 0/4/4 - (still down: node1-2.grid.orbit-lab.org,node2-1.grid.orbit-lab.org,node1-1.grid.orbit-lab.org) [20 sec.]
 INFO stdlib: Waiting for nodes (Up/Down/Total): 0/4/4 - (still down: node1-2.grid.orbit-lab.org,node2-1.grid.orbit-lab.org,node1-1.grid.orbit-lab.org) [31 sec.]
 INFO stdlib: Waiting for nodes (Up/Down/Total): 0/4/4 - (still down: node1-2.grid.orbit-lab.org,node2-1.grid.orbit-lab.org,node1-1.grid.orbit-lab.org) [41 sec.]
 INFO stdlib: Waiting for nodes (Up/Down/Total): 0/4/4 - (still down: node1-2.grid.orbit-lab.org,node2-1.grid.orbit-lab.org,node1-1.grid.orbit-lab.org) [51 sec.]
 INFO node2-2.grid.orbit-lab.org: Device 'net/w0' reported Not-Associated
 INFO node1-2.grid.orbit-lab.org: Device 'net/w0' reported Not-Associated
 INFO stdlib: Waiting for nodes (Up/Down/Total): 2/2/4 - (still down: node2-1.grid.orbit-lab.org,node1-1.grid.orbit-lab.org) [61 sec.]
 INFO node2-2.grid.orbit-lab.org: Device 'net/w0' reported 76:01:22:6E:DB:FD
 INFO ALL_UP: Event triggered. Starting the associated tasks.
 INFO exp: This is my first MobilityFirst experiment
 INFO exp: Initializing resources
 INFO exp: Request from Experiment Script: Wait for 20s....
 INFO node1-2.grid.orbit-lab.org: Device 'net/w0' reported 76:5D:54:9F:2E:AE
 INFO node2-1.grid.orbit-lab.org: Device 'net/w0' reported 76:01:22:6E:DB:FD
 INFO node1-1.grid.orbit-lab.org: Device 'net/w0' reported 76:5D:54:9F:2E:AE
 INFO exp: Bringing up routers...
 INFO exp: Request from Experiment Script: Wait for 5s....
 INFO exp: Bringing up host stacks...
 INFO exp: Access the nodes to run a program
 INFO exp: Request from Experiment Script: Wait for 10000s....
A few comments on the obtained output:
- The experiment ID can be seen on one of the first lines, it will be useful for using OML to retrieve the output for OML-enabled experiments. (this experiment does not have any outputs.)
- The GUIDs assigned to the nodes can be seen. For this particular snippet, the routers (nodes1-1 and 1-2 on the grid) are assigned GUID 1 and 2, and the hosts (nodes2-1 and 2-2 on the grid) have GUID 101 and 102. Since we have a simple topology in this experiment, only a single instance of GNRS server is running, which as shown above is hosted by router with GUID 1.
Test The Network
Before proceeding to the next step, make sure your OMF script has reached the line:
INFO exp: Request from Experiment Script: Wait for 10000s....
This will be the signal that the host and router components are up.
Now you can proceed and using the previously opened consoles log in into the two host nodes (GUIDs 101 and 102) that will be used to run the simple 'mfping' application. In order to access a running Orbit node ssh into it as follow:
ssh root@nodex-y
Where x-y has to be replaced by the actual numbers identifying the node.
Once logged in, run on the node with GUID 102 the mfping 'server' component properly specifying the application GUIDs:
mfping -s -m 102 -o 101
where "-s" specifies that the host is running as server, "-m" specifies the source guid and "-o" the destination one
To run the mfping 'client' start on the client with GUID 101 the command:
mfping -c -m 101 -o 102 -n 10
Where "-c" specifies the client is running and "-n" specifies the number of pings between the two nodes. If successfully executed, the client will display some information similar to the following snippet
root@node1-1:~# mfping -c -m 101 -o 102 -n 10
64 bytes received: seq_n=0, time=25.1470 msec
64 bytes received: seq_n=1, time=23.7070 msec
64 bytes received: seq_n=2, time=20.0559 msec
64 bytes received: seq_n=3, time=24.0371 msec
64 bytes received: seq_n=4, time=23.1831 msec
64 bytes received: seq_n=5, time=20.3069 msec
64 bytes received: seq_n=6, time=24.1379 msec
64 bytes received: seq_n=7, time=19.6230 msec
64 bytes received: seq_n=8, time=20.3931 msec
64 bytes received: seq_n=9, time=20.2239 msec
Finish
Once the application has successfully completed its task, follow these steps to complete the experiments:
- Kill the mfping server using Ctrl-C on the corresponding node.
- On the grid's console running the experiment script, interrupt the experiment using the Ctrl-C key combination.
This will stop all the applications and will conclude the experiment.
References
For more information regarding the MobilityFirst project, visit the project page: http://mobilityfirst.winlab.rutgers.edu/
For more information regarding the prototype design and updated status, visit the wiki page: https://mobilityfirst.orbit-lab.org/
Attachments (1)
- MFTutorialNetwork.png (32.0 KB ) - added by 10 years ago.
Download all attachments as: .zip