
Table of Contents
Tutorial: OpenStack Setup
Requirements:
- Setup/Practice of Orbit Nodes.
- Any available Orbit Sandbox Node
- Ubuntu 22.04.2 LTS (Choice is up to you)
In this tutorial, we will be using one of the sb1 nodes for setting up OpenStack. However, sb(1-10) should also be capable for OpenStack setup.
Make sure you have Ubuntu 22.04.2 (ubuntu2204-beta.ndz) LTS. To get the Ubuntu Version, follow these steps after ssh'ing into your console. Substitute for the image and node you want.
The below steps illustrate loading Ubuntu 22.04.2 LTS for node1-2 of sb1. For the sb1 console,
username@console:~$ omf tell -t node1-2 -a offh
username@console:~$ omf load -t node1-2 -i ubuntu2204-beta.ndz
username@console:~$ omf tell -t node1-2 -a on
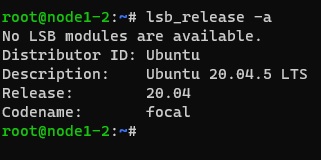
To verify if you have loaded your Ubuntu version properly, use this command after ssh into the node1-2
root@node1-2:~# lsb_release -a
This will list the current version of Ubuntu loaded.
Example Image:

Set up an OpenStack development environment via DevStack
After loading your version of Ubuntu, you can follow below steps to install OpenStack
- Update and Upgrade Packages:
root@node1-2:~# sudo apt-get update && sudo apt-get upgrade -y - Install Git:
root@node1-2:~# sudo apt-get install git
- Clone the DevStack Repository:
root@node1-2:~# git clone https://github.com/openstack/devstack.git
- Create a Stack User:
root@node1-2:~# sudo ./devstack/tools/create-stack-user.sh
- Switch to the Stack User:
root@node1-2:~# sudo su stack
stack@node1-2:/root$ cd ~ - Clone the DevStack Repository (as the Stack User):
stack@node1-2:~$ git clone https://git.openstack.org/openstack-dev/devstack
- Remove the Existing Python 3 Pip Package (if present) and Download and Install the Latest Python 3 Pip Package:
stack@node1-2:~$ sudo apt remove python3-pip
stack@node1-2:~$ wget https://bootstrap.pypa.io/get-pip.py
stack@node1-2:~$ sudo python3 get-pip.py
- Install a Specific Version of the Cryptography Package(there is version conflict with the OpenSSL package automatically installed by dev stack, install the below version to prevent this issue):
stack@node1-2:~$ pip install cryptography==38.0.4
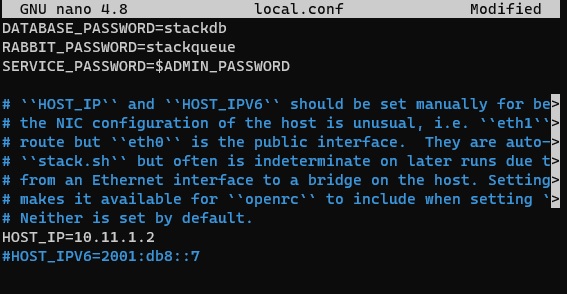
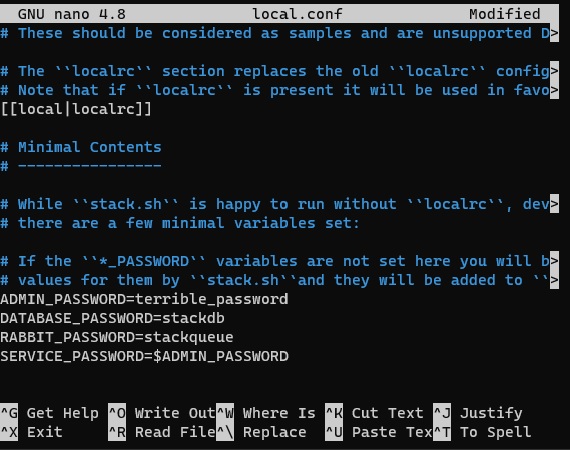
- Copy the local.conf into the Devstack Folder:
stack@node1-2:~$ cd devstack/samples/local.conf devstackstack@node1-2:~$ cd devstack - Identify Node's IP Address; Configure and Setup local.conf in Devstack Folder According to Requirement (either the controller or compute node):
stack@node1-2:~/devstack$ hostname -I
Example Image of Getting Node's IP Address:

stack@node1-2:~/devstack$ cd
stack@node1-2:~/devstack$ nano local.conf
Scroll to the ADMIN_PASSWORD, and change the password to what you prefer. Afterwards, scroll to HOST_IP. Remove the comment in front of the HOST_IP and set the IP to that of the what IP address was given by hostname -I (10.11.1.2 this case). Save changes.
Example Images of Changed Password and IP Address:


Set up a remote desktop through Google Remote Desktop
To ensure OpenStack Dashboard displays, you must download Google Remote Desktop and use Google Remote Desktop
- Install XServer Packages or Gnome-Shell for Google Remote Desktop:
stack@node1-2:~/devstack$ sudo apt-get install xfce4 xfce4-goodies -y #For Xfcestack@node1-2:~/devstack$ sudo apt-get install gnome-shell -y #For Gnome-Shell - Download Debian File for Google Remote Desktop:
stack@node1-2:~/devstack$ wget https://dl.google.com/linux/direct/chrome-remote-desktop_current_amd64.deb
- Install Google Remote Desktop:
stack@node1-2:~/devstack$ sudo apt install ./chrome-remote-desktop_current_amd64.deb -y
- Start the Google Remote Desktop by Logging into https://remotedesktop.google.com/headless. Click on Begin → Next → Authorize. Copy DISPLAY code into terminal:
Example of Display Code in Terminal:

- Go to https://remotedesktop.google.com/access. Click on the Node and Enter Pin. Afterwards, Select Xfce Session, which will Display the Remote Desktop Access. Afterwards, Enter the Terminal in the Xfce Session.
- Remove the psutil direction and any relevant files
stack@node1-2:~$ sudo rm -rf /usr/lib/python3/dist-packages/psutil
stack@node1-2:~$ sudo rm -rf /usr/lib/python3/psutil-5.9.0.egg-info #For Ubuntu 22.04.2 LTS - Afterwards, Install Firefox on the Xfce Session to Allow OpenStack Dashboard to Later Appear.
For Ubuntu 22.04.2 LTS,
stack@node1-2:~$ wget -O ~/Firefox.tar.bz2 "https://download.mozilla.org/?product=firefox-latest&os=linux64"
stack@node1-2:~$ sudo tar xjf ~/Firefox.tar.bz2 -C /opt/
stack@node1-2:~$ sudo ln -s /opt/firefox/firefox /usr/local/bin/firefox
stack@node1-2:~$ firefox #Run firefox on the terminal
Start the OpenStack run-program
8.Open a new terminal and cd into devstack
stack@node1-2:~$ cd devstack
- Run OpenStack Bash File:
stack@node1-2:~/devstack$ FORCE=yes ./stack.sh
Wait for around 15-20 minutes for all the packages and systems to be installed. Once installation is done, you are permitted to access the Horizon Dashboard and Keystone Identity. You will be prompted with a similar message to the output given below. You can CTRL+Click in the Xfce Session to navigate to the Dashboard and Identity, allowing you then to explore OpenStack and all its availabilities through DevStack. If this does not work, copy the link, and use Firefox to access the the Horizon dashboard.
Example Output from Successful Run:
This is your host IP address: 10.11.1.2
This is your host IPv6 address: ::1
Horizon is now available at http://10.11.1.2/dashboard
Keystone is serving at http://10.11.1.2/identity/
The default users are: admin and demo The password: *(Password set by you during installation process)
You can log in to view the Horizon dashboard(http://10.11.1.2/dashboard) using below default credentials
Hope You Figure Out the Purpose of OpenStack
Attachments (6)
- lsb_release.jpg (19.6 KB ) - added by 3 years ago.
- hostname-I.jpg (10.5 KB ) - added by 3 years ago.
- ipaddress.jpg (67.9 KB ) - added by 3 years ago.
- badpassword.jpg (91.4 KB ) - added by 3 years ago.
- goodies.jpg (72.2 KB ) - added by 3 years ago.
- runcommand.jpg (72.1 KB ) - added by 3 years ago.
Download all attachments as: .zip