
| Version 27 (modified by , 13 months ago) ( diff ) |
|---|
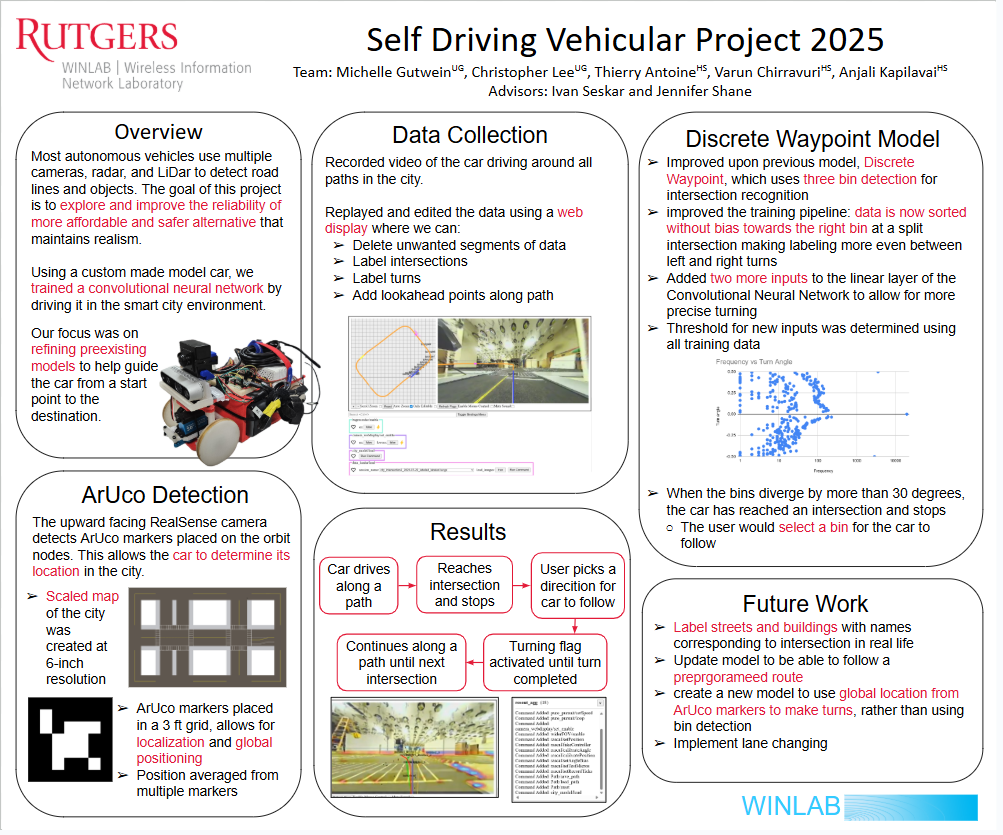
Self Driving Vehicular Project
Team: Michelle Gutwein and Christopher Lee
Advisors: Ivan Seskar and Jennifer Shane
Project Description & Goals:
Build and train miniature autonomous cars to drive in a miniature city.
Technologies: ROS (Robot Operating System), Pytorch
Week 1
Read through the manual provided to us.
Week 1 slides
Week 2
Learned what ROS is and how to use it
Also got to know the car, RASCAL
Week 2 slides
Week 3
Read through all of the code in the Gitlab
Learned how to record and edit data on the web display
Week 3 slides
Week 4
Learned how to train a model
Trained and tested the model on simple paths
Week 4 slides
Connecting to Rascal
First connect to Zerotier if you're using a personal computer. (If you are not using a personal computer, then plug the car directly into a monitor to access the car).
- Sign into Zerotier under the account rascalstonesdc-at-gmail.com password: si2022sdc
- Connect to the network: rascalstonesdc's 1st network (ID: d3ecf5726d1a9fcd)
- Now you can open a terminal and connect to the IP address of the rascal using the command: ssh rascal@10.244.114.238
- Next, run the command: roslaunch rascal pure_pursuit.launch to launch all the nodes
- In a web page type 10.244.114.238:5000 to open the web display where you can record and edit data for training
Collecting Data
To record data:
- Press bagrecorder/enable on the web display to start recording
- Use the joystick or keys on the keyboard (wasd) to move the car around
- Press bagrecorder again to stop recording
- Open data opt/upcar/dataProcessing and type python bag2AllData.py in the terminal to access all recorded sessions
- Select the number that you want to download (should be the most recent one)
- After it finishes downloading you can type the command: roslaunch rascal sim.launch which will upload that session to the web display
- In the web display you can play the video to see what the camera recorded (you might need to refresh the page to see the session come up)
- You can now edit the data that will be used for training
- To save data, run the data_loader/smoothen command
Training Rascal
We used the fisheye model to train on
- Open a new terminal and connect to the rascal server's IP address by using this command: ssh rascaltrain@10.244.176.240
- Open /upcar/dataProcessing and type ./copyFromCar.sh which will get the files from the car and bring them over to the server
- It will ask you to select a host. Choose 1) rascal@172.24.114.238 which is the car's IP address
- If it asks for a password it's always si2022sdc
- It will ask you which sessions you want to copy over (pick the session version of the files you want that says smooth)
- If you go to /sessions and type ls your chosen files should be listed there
- Go back to /upcar and move your data to /rascaltraining/data: mv dataProcessing/sessions/<your file name here> rascaltraining/data
- If you go into /rascaltraining/data you should see your file listed
- Go back to /rascaltraining and type the command: python trainModel.py -m fisheye —center_width 30 —num_bins 3 —use_labels 1.0 -s labels
- Now your model is being trained
- To stop training press enter
- Remember to stop training when the validation loss doesn't seem to be decreasing by a significant amount anymore to avoid overfitting
- To push your newly made model to gitlab, go to /rascaltraining/savedModels and type git add -f <your model number here>
- Next type the command git commit -m "<give it a name>"
- Next type the command git push origin main
- Finally, back in the car's terminal type git pull origin main
You're now ready to start testing!
Testing Rascal
To test rascal:
- Enter ./launch_with_model.sh pure_pursuit in the car's terminal (not the server anymore)
- Open up the web display
- Run these commands in the web display:
- data_loader/load
- sim_camera/set_enable (set to true)
- ml/imgDisp (set to true)
- ml/0/enable (click enable)
- ml/0/reset
- data_loader/load
Watch the car move on it's own! Make sure it doesn't crash!
Attachments (2)
- WINLAB_poster_2025.png (343.0 KB ) - added by 11 months ago.
- P13 Self driving vehicular poster.pptx.png (1.5 MB ) - added by 11 months ago.
Download all attachments as: .zip