
| Version 17 (modified by , 11 years ago) ( diff ) |
|---|
Working with GNURadio and Nutaq ZeptoSDR
Table of Contents
- SDR Tutorials
Description
This example will demonstrate how to use GRC (GNU Radio Companion) with Nutaq's Zepto SDR.
Set up
- Before you can access the testbed, you need to make a reservation and get it approved by the reservation service. After receiving the reservation's confirmation (approval) email, load the ubuntu-14-04-64bit-sdr.ndz on two nodes and turn them on - one node with a Zepto SDR and the other node a USRP. For this example we'll use node20-13 and node20-20 which have a Zepto SDR and USRP, respectively:
Login into reserved domain: ssh username@grid.orbit-lab.org
Login into reserved domain
During your approved time slot, you will be able to ssh into the console of the respective domain. A console is a dedicated machine that allows access to all resources in that domain.
For example, to access the sandbox1:
yourhost>ssh username@console.sb1.orbit-lab.org

Using username "username".
Authenticating with public key "xxxxxxxxx"
Welcome to Ubuntu 12.04.1 LTS (GNU/Linux 3.2.0-36-generic x86_64)

 * Documentation:  https://help.ubuntu.com/

  System information as of Mon Jan 28 20:25:50 EST 2013

  System load:  0.0               Processes:           93
  Usage of /:   2.7% of 69.43GB   Users logged in:     0
  Memory usage: 6%                IP address for eth0: 10.50.18.10
  Swap usage:   0%                IP address for eth1: 10.18.0.10

  Graph this data and manage this system at https://landscape.canonical.com/

9 packages can be updated.
0 updates are security updates.

|-----------------------------------------------------------------|
|                 *** For authorized use only ***                 |
| This system is for the use of authorized users only.  All users |
| are expected to comply with the "Acceptable Use Policy" availa- |
| ble at http://www.orbit-lab.org/AUP.html                        |
| Individuals using this computer system, are subject to having   |
| all of their activities on this system monitored and recorded   |
| by system personnel.                                            |
|                                                                 |
| Anyone using this system expressly consents to such monitoring  |
| and is advised that if such monitoring reveals possible         |
| evidence of criminal activity, system personnel may provide the |
| evidence of such monitoring to law enforcement officials.       |
|                                                                 |
| Email question, comments or problems to help@orbit-lab.org      |
|-----------------------------------------------------------------|

username@console.sb1:~$
'Load an image on the nodes: omf load -i ubuntu-14-04-64bit-sdr.ndz -t [ [2013][2020] ]'
Load an Image
- Before we begin using the nodes, it's a good idea to check their status first. This is done with the omf stat command.
omf stat
This omf command is used to display the power status of the node/domain.
Usage: omf stat
username@consoles.outdoor:omf stat
Returns the status of the nodes in a testbed
Usage:
      omf-5.4 stat [-h] [-s] [-t TOPOLOGY] [-c AGGREGATE]

      With:
      -h, --help                print this help message
      -s, --summary             print a summary of the node status for the testbed
      -c, --config AGGREGATE    use testbed AGGREGATE
      -t, --topology TOPOLOGY   a valid topology file or description (defaults to 'system:topo:all')

      Some Examples:
                    omf-5.4 stat
                    omf-5.4 stat -s
                    omf-5.4 stat -t omf.nicta.node1,omf.nicta.node2 -c sb1
                    omf-5.4 stat -t system:topo:all -c grid
Individual nodes are identified in the output of stat command by their fully qualified domain name (FQDN). This establishes their "coordinates" and the "domain" to which they belong. Nodes in different domains typically can NOT see each other. Node can be in 1 of 3 states:
POWEROFF Node is Available for use but turned off POWERON Node is Available and is on NOT REGISTERED Node is not Available for use Example: omf stat on the outdoor domain
user@console.outdoor:~# omf stat -t all

 INFO NodeHandler: OMF Experiment Controller 5.4 (git 6d34264)
 INFO NodeHandler: Slice ID: default_slice (default)
 INFO NodeHandler: Experiment ID: default_slice-2012-10-14t14.42.15-04.00
 INFO NodeHandler: Message authentication is disabled
 INFO Experiment: load system:exp:stdlib
 INFO property.resetDelay: value = 210 (Fixnum)
 INFO property.resetTries: value = 1 (Fixnum)
 INFO Experiment: load system:exp:eventlib
 INFO Experiment: load system:exp:stat
 INFO Topology: Loading topology ''.
 INFO property.nodes: value = "system:topo:all" (String)
 INFO property.summary: value = false (FalseClass)
 INFO Topology: Loading topology 'system:topo:all'.
 Talking to the CMC service, please wait
-----------------------------------------------
 Domain: outdoor.orbit-lab.org
 Node: node3-6.outdoor.orbit-lab.org   	 State: NOT REGISTERED
 Node: node3-3.outdoor.orbit-lab.org   	 State: POWEROFF
 Node: node2-10.outdoor.orbit-lab.org    State: POWEROFF
 Node: node1-10.outdoor.orbit-lab.org    State: POWEROFF
 Node: node1-8.outdoor.orbit-lab.org   	 State: POWERON
 Node: node1-6.outdoor.orbit-lab.org   	 State: POWERON
 Node: node3-2.outdoor.orbit-lab.org   	 State: POWEROFF
 Node: node3-1.outdoor.orbit-lab.org   	 State: POWEROFF
 Node: node1-3.outdoor.orbit-lab.org   	 State: POWERON
 Node: node3-5.outdoor.orbit-lab.org   	 State: POWEROFF
 Node: node2-5.outdoor.orbit-lab.org   	 State: NOT REGISTERED
 Node: node1-2.outdoor.orbit-lab.org   	 State: POWERON
-----------------------------------------------
 INFO Experiment: Switching ON resources which are OFF
 INFO EXPERIMENT_DONE: Event triggered. Starting the associated tasks.
 INFO NodeHandler:
 INFO NodeHandler: Shutting down experiment, please wait...
 INFO NodeHandler:
 INFO run: Experiment default_slice-2012-10-14t14.42.15-04.00 finished after 0:6
- It is recommended that the node be in the POWEROFF state prior to any experiment process. If the node is in the POWERON state you can use the omf tell command to get the node into the off state.
omf tell
OMF command to control the power state/reset the nodes.
Usage: omf tell
user@console:omf tell
Switch ON/OFF and reboot the nodes in a testbed
Usage:
      omf tell [-h] -t TOPOLOGY -a ACTION [-c AGGREGATE]

      With:
      -h, --help           print this help message

      -a, --action ACTION  specify an action
      ACTION:
      on              turn node(s) ON
      offs            turn node(s) OFF (soft)
      offh            turn node(s) OFF (hard)
      reboot          reboots node(s) (soft)
      reset           resets node(s) (hard)

      -h, --help                print this help message
      -t, --topology TOPOLOGY   a valid topology file or description (MANDATORY)
      -c, --config AGGREGATE    use testbed AGGREGATE

      Some Examples:
                    omf tell -a reset -t node1-1.grid.orbit-lab.org
                    omf tell -a on -t system:topo:all -c grid
                    omf tell -a reboot -t node1-1
                    omf tell -a offh -t [1..2,1..5]
                    omf tell -a offh -t system:topo:all
                    omf tell -a reset -t system:topo:imaged
The commands are: on, offh (equivalent to pulling out the power cord), offs (software shutdown), reboot (software reboot) and reset (hardware reset).
Example: turn off node1-1 on the outdoor domain
user@console.outdoor:~# omf tell -a offh -t node1-1

 INFO NodeHandler: OMF Experiment Controller 5.4 (git 3fb37b9)
 INFO NodeHandler: Reading configuration file /etc/omf-expctl-5.4/services.yaml
 INFO NodeHandler: Add domain http - http://internal1.orbit-lab.org:5054/
 INFO NodeHandler: Add domain http - http://repository1.orbit-lab.org:5054/
 INFO NodeHandler: Slice ID: default_slice (default)
 INFO NodeHandler: Experiment ID: default_slice-2014-09-30t00.24.28.504-04.00
 INFO NodeHandler: Message authentication is disabled
 INFO Experiment: load system:exp:stdlib
 INFO property.resetDelay: resetDelay = 230 (Fixnum)
 INFO property.resetTries: resetTries = 1 (Fixnum)
 INFO Experiment: load system:exp:eventlib
 INFO Experiment: load system:exp:winlib
 INFO Experiment: load system:exp:tell
 INFO property.nodes: nodes = "node1-1" (String)
 INFO property.command: command = "offh" (String)

Talking to the CMC service, please wait
-----------------------------------------------
 Node: node1-1.outdoor.orbit-lab.org   	 Reply: OK
-----------------------------------------------

 INFO EXPERIMENT_DONE: Event triggered. Starting the associated tasks.
 INFO NodeHandler:
 INFO NodeHandler: Shutting down experiment, please wait...
 INFO NodeHandler:
 INFO run: Experiment default_slice-2014-09-30t00.24.28.504-04.00 finished after 0:10
- Once node set is on an POWEROFF state, load an image with omf load command
omf load
Load command is used to put an image onto the hard disk of the node.
Usage: omf load
Install a given disk image on the nodes in a testbed
Usage:
      omf-5.4 load [-h] [-i IMAGE_PATH] [-o TIMEOUT] [-t TOPOLOGY] [-c AGGREGATE]

      With:
      -h, --help                print this help message
      -c, --config AGGREGATE    use testbed AGGREGATE
      -t, --topology TOPOLOGY   a valid topology file or description (defaults to 'system:topo:all')
                                (if a file 'TOPOLOGY' doesn't exist, interpret it as a comma-separated list of nodes)
      -i, --image IMAGE         disk image to load
                                (default is 'baseline.ndz', the latest stable baseline image)
      -o, --timeout TIMEOUT     a duration (in sec.) after which imageNodes should stop waiting for
                                nodes that have not finished their image installation
                                (default is 800 sec, i.e. 13min 20sec)
          --outpath PATH        Path where the resulting Topologies should be saved
                                (default is '/tmp')
          --outprefix PREFIX    Prefix to use for naming the resulting Topologies
                                (default is your experiment ID)

      Some Examples:
                    omf-5.4 load
                    omf-5.4 load -t system:topo:all -i baseline-2.4.ndz
                    omf-5.4 load -t omf.nicta.node1 -i wireless-2.6.ndz
                    omf-5.4 load -t omf.nicta.node1,omf.nicta.node2 -i baseline.ndz -o 400
                    omf-5.4 load -t system:topo:circle -i my_Own_Image.ndz
                    omf-5.4 load -t my_Own_Topology -i baseline-2.2.ndz -t 600 -c grid
                    omf-5.4 load -t my_Own_Topology --outpath ./ --outprefix my_Own_Prefix
Two important arguments are TOPOLOGY describing the set of nodes one wishes to image , and !IMAGE specifying the name of the image one wants to load the nodes with. If the imaging process does not does not finish within the default timeout period, that period can be increase by using the -o flag (e.g. -o 1600). Typical command to load both nodes of sandbox 1 with the baseline image would look like:
If the node is in the NOT REGISTERED state, you may need to wait for it to recover the POWEROFF state (it some times requires a few moments for the services to sync up). If the node takes more than 60 seconds to come out of the NODE NOT AVAILABLE state please report it to an administrator.Example: omf load-i baseline.ndz -t node1-1
username@console.sb3:~$ omf load -i baseline.ndz -t node1-1

DEBUG FQDN:console.sb3.orbit-lab.org:
 INFO NodeHandler: OMF Experiment Controller 5.4 (git 861d645)
 INFO NodeHandler: Reading configuration file /etc/omf-expctl-5.4/services.yaml
 INFO NodeHandler: Add domain http - http://internal1.orbit-lab.org:5054/
 INFO NodeHandler: Add domain http - http://repository1.orbit-lab.org:5054/
 INFO NodeHandler: Add domain http - http://external1.orbit-lab.org:5054/
 INFO NodeHandler: Slice ID: pxe_slice
 INFO NodeHandler: Experiment ID: pxe_slice-2018-08-08t13.41.37.814-04.00
 INFO NodeHandler: Message authentication is disabled
 INFO Experiment: load system:exp:stdlib
 INFO property.resetDelay: resetDelay = 230 (Fixnum)
 INFO property.resetTries: resetTries = 1 (Fixnum)
 INFO Experiment: load system:exp:eventlib
 INFO Experiment: load system:exp:winlib
 INFO Experiment: load system:exp:imageNode
 INFO property.nodes: nodes = "node1-1" (String)
 INFO property.image: image = "baseline.ndz" (String)
 INFO property.domain: domain = "sb3.orbit-lab.org" (String)
 INFO property.outpath: outpath = "/tmp" (String)
 INFO property.outprefix: outprefix = "pxe_slice-2018-08-08t13.41.37.814-04.00" (String)
 INFO property.timeout: timeout = 800 (Fixnum)
 INFO property.resize: resize = nil (NilClass)
 INFO Topology: Loaded topology 'system:topo:registered'.
 INFO property.resetDelay: resetDelay = 100 (Fixnum)
 INFO Experiment: Resetting resources
 INFO stdlib: Waiting for nodes (Up/Down/Total): 0/1/1 - (still down: node1-1.sb3.orbit-lab.org) [0 sec.]
 INFO stdlib: Waiting for nodes (Up/Down/Total): 0/1/1 - (still down: node1-1.sb3.orbit-lab.org) [10 sec.]
 INFO stdlib: Waiting for nodes (Up/Down/Total): 0/1/1 - (still down: node1-1.sb3.orbit-lab.org) [20 sec.]
 INFO stdlib: Waiting for nodes (Up/Down/Total): 0/1/1 - (still down: node1-1.sb3.orbit-lab.org) [30 sec.]
 INFO stdlib: Waiting for nodes (Up/Down/Total): 0/1/1 - (still down: node1-1.sb3.orbit-lab.org) [40 sec.]
 INFO stdlib: Waiting for nodes (Up/Down/Total): 0/1/1 - (still down: node1-1.sb3.orbit-lab.org) [50 sec.]
 INFO exp: Progress(0/0/1): 0/0/0 min(node1-1.sb3.orbit-lab.org)/avg/max (59) - Timeout: 790 sec.
 INFO ALL_UP: Event triggered. Starting the associated tasks.
 INFO BRING_UP: Event triggered. Starting the associated tasks.
 INFO Experiment: Bringing up resources
 INFO exp: Progress(0/0/1): 50/50/50 min(node1-1.sb3.orbit-lab.org)/avg/max (59) - Timeout: 780 sec.
 INFO exp: Progress(0/0/1): 80/80/80 min(node1-1.sb3.orbit-lab.org)/avg/max (59) - Timeout: 770 sec.
 INFO exp: Progress(1/0/1): 100/100/100 min()/avg/max (59) - Timeout: 760 sec.
 INFO exp:  -----------------------------
 INFO exp:  Imaging Process Done
 INFO exp:  1 node successfully imaged - Topology saved in '/tmp/pxe_slice-2018-08-08t13.41.37.814-04.00-topo-success.rb'
 INFO exp:  -----------------------------
 INFO EXPERIMENT_DONE: Event triggered. Starting the associated tasks.
 INFO NodeHandler:
 INFO NodeHandler: Shutting down experiment, please wait...
 INFO NodeHandler:
 INFO NodeHandler: Shutdown flag is set - Turning Off the resources
 INFO run: Experiment pxe_slice-2018-08-08t13.41.37.814-04.00 finished after 1:44
- Before we begin using the nodes, it's a good idea to check their status first. This is done with the omf stat command.
Turn on the nodes: omf tell -a on -t [ [2013][2020] ]
Turn the Nodes ON
To turn the nodes on use omf tell command:
omf tell
OMF command to control the power state/reset the nodes.
Usage: omf tell
user@console:omf tell
Switch ON/OFF and reboot the nodes in a testbed
Usage:
      omf tell [-h] -t TOPOLOGY -a ACTION [-c AGGREGATE]

      With:
      -h, --help           print this help message

      -a, --action ACTION  specify an action
      ACTION:
      on              turn node(s) ON
      offs            turn node(s) OFF (soft)
      offh            turn node(s) OFF (hard)
      reboot          reboots node(s) (soft)
      reset           resets node(s) (hard)

      -h, --help                print this help message
      -t, --topology TOPOLOGY   a valid topology file or description (MANDATORY)
      -c, --config AGGREGATE    use testbed AGGREGATE

      Some Examples:
                    omf tell -a reset -t node1-1.grid.orbit-lab.org
                    omf tell -a on -t system:topo:all -c grid
                    omf tell -a reboot -t node1-1
                    omf tell -a offh -t [1..2,1..5]
                    omf tell -a offh -t system:topo:all
                    omf tell -a reset -t system:topo:imaged
The commands are: on, offh (equivalent to pulling out the power cord), offs (software shutdown), reboot (software reboot) and reset (hardware reset).
Example: turn off node1-1 on the outdoor domain
user@console.outdoor:~# omf tell -a offh -t node1-1

 INFO NodeHandler: OMF Experiment Controller 5.4 (git 3fb37b9)
 INFO NodeHandler: Reading configuration file /etc/omf-expctl-5.4/services.yaml
 INFO NodeHandler: Add domain http - http://internal1.orbit-lab.org:5054/
 INFO NodeHandler: Add domain http - http://repository1.orbit-lab.org:5054/
 INFO NodeHandler: Slice ID: default_slice (default)
 INFO NodeHandler: Experiment ID: default_slice-2014-09-30t00.24.28.504-04.00
 INFO NodeHandler: Message authentication is disabled
 INFO Experiment: load system:exp:stdlib
 INFO property.resetDelay: resetDelay = 230 (Fixnum)
 INFO property.resetTries: resetTries = 1 (Fixnum)
 INFO Experiment: load system:exp:eventlib
 INFO Experiment: load system:exp:winlib
 INFO Experiment: load system:exp:tell
 INFO property.nodes: nodes = "node1-1" (String)
 INFO property.command: command = "offh" (String)

Talking to the CMC service, please wait
-----------------------------------------------
 Node: node1-1.outdoor.orbit-lab.org   	 Reply: OK
-----------------------------------------------

 INFO EXPERIMENT_DONE: Event triggered. Starting the associated tasks.
 INFO NodeHandler:
 INFO NodeHandler: Shutting down experiment, please wait...
 INFO NodeHandler:
 INFO run: Experiment default_slice-2014-09-30t00.24.28.504-04.00 finished after 0:10
Once the nodes boot up, verify that the interface to each SDR is configured correctly.
Verify connection to Zepto SDR:
ifconfig eth2 192.168.0.1 netmask 255.255.255.0 mtu 9000 up
ping 192.168.0.101
Verify connection to USRP:
ifconfig eth2 192.168.10.1 netmask 255.255.255.0 mtu 9000 up
ping 192.168.10.2
Run the GRC scripts
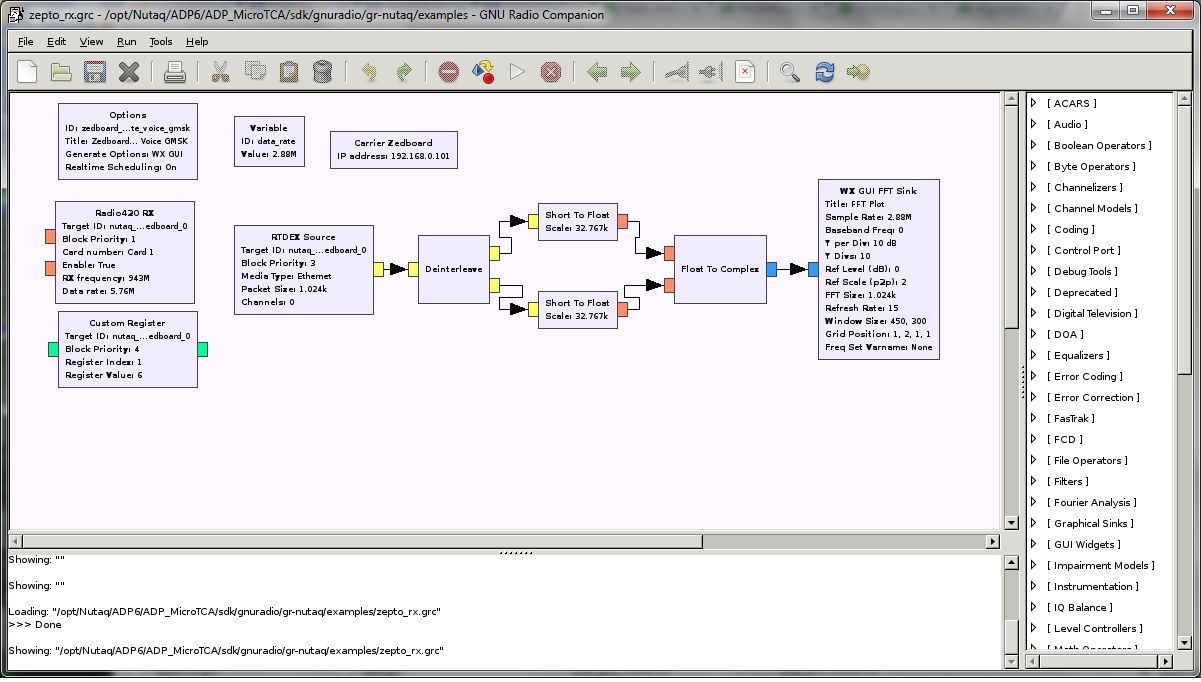
Download the receiver zepto_rx.grc into node20-13 and open it with GNU Radio Companion.
root@node20-13:~# cd /opt/Nutaq/ADP6/ADP_MicroTCA/sdk/gnuradio/gr-nutaq/examples
root@node20-13:/opt/Nutaq/ADP6/ADP_MicroTCA/sdk/gnuradio/gr-nutaq/examples# wget http://www.orbit-lab.org/raw-attachment/wiki/Tutorials/k0SDR/Tutorial10/zepto_rx.grc
root@node20-13:/opt/Nutaq/ADP6/ADP_MicroTCA/sdk/gnuradio/gr-nutaq/examples# cd ..
root@node20-13:/opt/Nutaq/ADP6/ADP_MicroTCA/sdk/gnuradio/gr-nutaq#sh launch_gnuradio_companion.sh &
A window should pop up similar to the following:

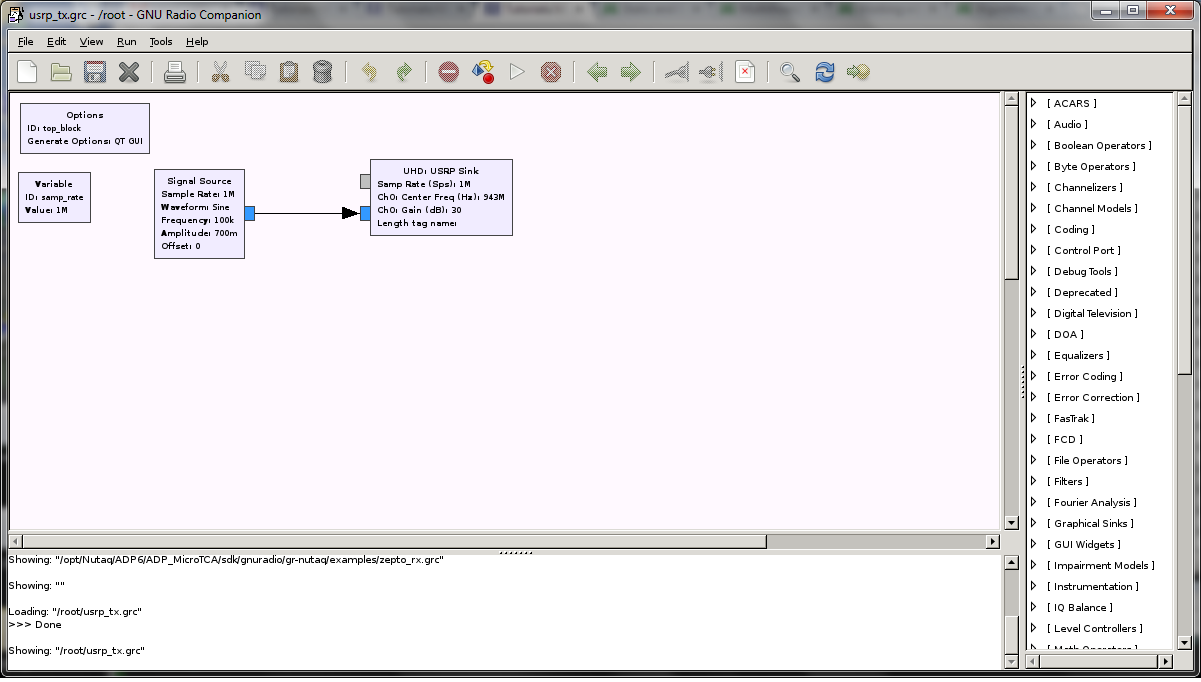
Next download the transmitting side usrp_tx.grc and open with GNU Radio Companion.
root@node20-20:~# wget http://www.orbit-lab.org/raw-attachment/wiki/Tutorials/k0SDR/Tutorial10/usrp_tx.grc
root@node20-20:~# gnuradio-companion
A window should pop up similar to the following:

On both GRC windows click on the execute (side ways triangular) button to start both scripts. On the receiver side and spectrum window should open showing a carrier frequency. The details of the center frequency, power, gain, etc are in the GRC files - tweak a some of the parameters and validate by observing the spectrum.
Attachments (4)
- usrp_tx.grc (15.3 KB ) - added by 11 years ago.
- zepto_rx.grc (13.1 KB ) - added by 11 years ago.
- zepto_rx.png (130.8 KB ) - added by 11 years ago.
- usrp_tx.png (128.1 KB ) - added by 11 years ago.
Download all attachments as: .zip