
Building Sandbox 9
This page describes any important-like things that happen in setting up the Sandbox 9. Sandbox 9 will first be networked using legacy switching and static VLANs. Once the controller is deployed, virtual switches will be used.
Overview
This is the strategy regarding this department:
- Set up static VLANs based on ORBIT network infrastructure convention.
- introduce virtual switching once the OpenFlow controller can be implemented.
Preliminary setup based on ORBIT Network Infrastructure
As of now (6/26/09), we still have not began work on a controller. Without the controller, the virtual switches are nonfunctional, so we first begin by trying to build Sandbox 9 using static VLANs and legacy firmware.
Conventions used
3 types of VLANs are used on the ORBIT testbed: CM, Control, and Data. While the CM VLAN spans across all 10 testbeds (Grid + 9 Sandboxes), each testbed has its own Control and Data VLANs.
On the NEC switch, the 3 VLANS and a trunk are assigned according to conventions used for the ORBIT networks, except that 12 ports are allocated to each VLAN and trunk as of 7/2 :
Usage Ports VLAN ID CM 1-12 3 Control 13-24 27 Data 25-36 28 Trunk 37-48 -
DHCP
DHCP relay agents are only needed when the DHCP server and host are on separate VLANs. You don't need to configure the relay agent since the DHCP server is on the trunk connection and beyond the ASA. The ASA behaves as a router between the VLANs, and handles the relaying and VLAN tags.
There seems to be no way of configuring the switch to be a DHCP client. The switch's IP address was statically set on native VLAN 1 (Network). The commands for this are here.
Setup
A host is connected to a Control VLAN port (0/7), and the dhcp comes from trunk port 0/48. It will be able to bind to an address from Control, but not from any other VLAN.
Console
The convention used to wire the ports are:
- Eth0 - DMZ (10.50.x.x)
- Eth1 - Control (10.19.x.x)
Eth1 should be down because it compromises the routing table.
Making the controller from the OpenFlow Reference System Code. (7/14, 7/15)
Configuring the Console
The OpenFlow reference system contains code for a controller that makes an OpenFlow switch into a learning switch. This was built (but not installed) on the Console by following instructions on the OpenFlow site: http://www.openflowswitch.org/wk/index.php/Ubuntu_Install
The console was then configured to be VLAN aware for VLANs 27,28, and 100. The site referenced: http://ubuntuforums.org/showthread.php?t=703387
/etc/network/interfaces looked like this at the end:
# The primary network interface
auto eth0 eth1
iface eth0 inet dhcp

iface eth1 inet static
address 192.168.100.28
netmask 255.255.255.0

#auto eth1.27
iface eth1.27 inet static
address 10.19.0.10
netmask 255.255.0.0

#auto eth1.28
iface eth1.28 inet static
address 192.168.1.28
netmask 255.255.255.0

#auto eth1.100
iface eth1.100 inet static
address 172.16.100.1
netmask 255.255.255.0
Configuring the switchport
Eth1 of the Console was connected to a reconfigured trunk port that allowed VLANs 27,28, and 100. The IP's for the VLAN interfaces were assigned arbitrarily within the same subnet as the ones set for Sandbox9. An arbitraty trunk port (0/37) was chosen and reconfigured for this step. The commands:
sw-sb09(config)# sh int gi 0/37
interface gigabitethernet 0/37
  switchport mode trunk
  switchport trunk allowed vlan 1,3,27-28
  switchport trunk native vlan 1
!
sw-sb09(config)# int gi 0/37
sw-sb09(config-if)# no switchport trunk native vlan 1
!sw-sb09(config-if)# exit
!sw-sb09(config)# vlan 100
!sw-sb09(config-vlan)# exit
!sw-sb09(config)# interface vlan 100
!sw-sb09(config-if)# ip address 172.16.100.10 255.255.255.0
!sw-sb09(config-if)# interface gigabitethernet 0/37
!sw-sb09(config-if)# switchport trunk native vlan 100
!sw-sb09(config-if)# switchport trunk allowed vlan remove 1
!sw-sb09(config-if)# switchport trunk allowed vlan remove 3
!sw-sb09(config-if)# switchport trunk allowed vlan add 100
!sw-sb09(config-if)# save
The port ended up looking like this:
sw-sb09(config-if)# sh
interface gigabitethernet 0/37
  switchport mode trunk
  switchport trunk allowed vlan 27-28,100
We later realized that VLAN interfaces for VLANs 27 and 28 also need to be assigned IP addresses in order for the switch to be able to communicate with the controller's VLAN interfaces.
sw-sb09(config-if)# interface vlan 27
!sw-sb09(config-if)# ip address 10.19.0.20 255.255.0.0
!sw-sb09(config-if)# interface vlan 28
!sw-sb09(config-if)# ip address 192.168.1.20 255.255.255.0
!sw-sb09(config-if)# save
sw-sb09(config-if)# exit
sw-sb09(config)# exit
pinging the interfaces…success.
sw-sb09# ping 10.19.0.10
PING 10.19.0.10 (10.19.0.10): 56 data bytes
64 bytes from 10.19.0.10: icmp_seq=0 ttl=64 time=2.095 ms
64 bytes from 10.19.0.10: icmp_s^C
----10.19.0.10 PING Statistics----
2 packets transmitted, 2 packets received, 0.0% packet loss
round-trip min/avg/max = 1.097/1.596/2.095 ms
sw-sb09# ping 192.168.1.28
PING 192.168.1.28 (192.168.1.28): 56 data bytes
64 bytes from 192.168.1.28: icmp_seq=0 ttl=64 time=2.100 ms
64 bytes from 192.168.1.28: icmp_seq=1 ttl=64 time=1.013 ms
^C
----192.168.1.28 PING Statistics----
2 packets transmitted, 2 packets received, 0.0% packet loss
round-trip min/avg/max = 1.013/1.556/2.100 ms
establishing switch-controller connections
The code for the controller is found intuitively in the controller directory. Using ptcp:[port] as the connection method seems to work. We also wanted an output and a log of everything, so the full command was this (from the controller's directory) :
./controller ptcp:6633 -v —log-file=test.log
the first part of the output - you can see the OFPT_HELLO messages, negotiation of the OpenFlow verison, the OFPT_FEATURES_REQUEST, and the switch's OFPT_FEATURES_REPLY:
Jul 16 12:25:43|00001|vlog|WARN|opened log file test.log
Jul 16 12:25:53|00002|rconn|DBG|tcp: entering ACTIVE
Jul 16 12:25:53|00003|vconn|DBG|tcp:172.16.100.10:58499: sent (Success): hello (xid=0xacec814):

Jul 16 12:25:53|00004|vconn|DBG|tcp:172.16.100.10:58499: received: hello (xid=0x9a45bcaf):

Jul 16 12:25:53|00005|vconn|DBG|tcp:172.16.100.10:58499: negotiated OpenFlow version 0x97 (we support versions 0x97 to 0x97 inclusive, peer no later than version 0x97)
Jul 16 12:25:53|00006|vconn|DBG|tcp:172.16.100.10:58499: sent (Success): features_request (xid=0x9eebe16b):

Jul 16 12:25:53|00007|vconn|DBG|tcp:172.16.100.10:58499: sent (Success): set_config (xid=0xff52f51d): (sending flow expirations) miss_send_len=128

Jul 16 12:25:53|00008|vconn|DBG|tcp:172.16.100.10:58499: received: features_reply (xid=0x9eebe16b): ver:0x97, dpid:12345678987
n_tables:2, n_buffers:256
features: capabilities:0x17, actions:0x3ff
 0(25): addr:00:12:e2:c8:1f:b5, config: 0, state:0x1
 1(26): addr:00:12:e2:c8:1f:b6, config: 0, state:0x1
 2(27): addr:00:12:e2:c8:1f:b7, config: 0, state:0x1
 3(28): addr:00:12:e2:c8:1f:b8, config: 0, state:0x1
 4(29): addr:00:12:e2:c8:1f:b9, config: 0, state:0x1
 5(30): addr:00:12:e2:c8:1f:ba, config: 0, state:0x1
 6(31): addr:00:12:e2:c8:1f:bb, config: 0, state:0x1
 7(32): addr:00:12:e2:c8:1f:bc, config: 0, state:0x1
 8(33): addr:00:12:e2:c8:1f:bd, config: 0, state:0x1
 9(34): addr:00:12:e2:c8:1f:be, config: 0, state:0x1
 10(35): addr:00:12:e2:c8:1f:bf, config: 0, state:0x1
 11(36): addr:00:12:e2:c8:1f:c0, config: 0, state:0x1
Setting up the demo.
packet sniffing
The first experiment involved packet sniffing, and included the following steps:
- unplug all hosts connected to the virtual switch (VLAN 28 ports)
- start the controller
- plug in one host at a time
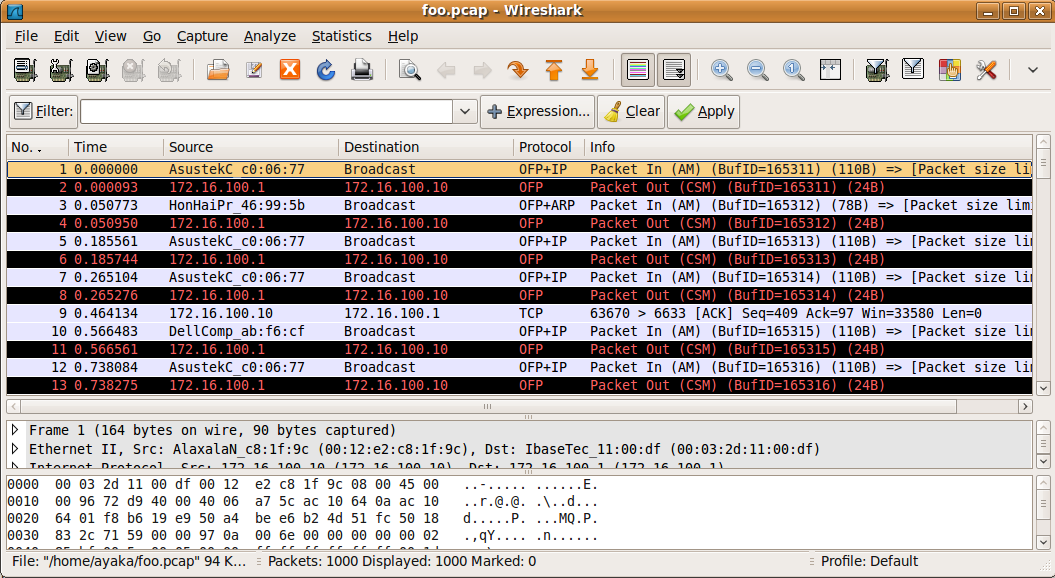
tcpdump was used to packet sniff on the VLAN100 interface on SB9 with this command:
tcpdump -i eth1.100 -w foo.pcap
Here, the log is saved in foo.pcap. This was later opened in wireshark on another PC (Given X11 didn't break, wireshark on sb9 would have worked) using the command
wireshark -r foo.pcap &
Wireshark can be updated with a OpenFlow dissector that comes with the OpenFlow reference system.
Directions on updating wireshark: http://www.openflowswitch.org/wk/index.php/Ubuntu_Install#Install_Wireshark_Dissector
The logs in wireshark are a bit harder to interpret than the verbose outputs of the controller itsself:

The experiment was later recreated with the Sandbox nodes.
- start packetsniffer
- start controller
- bring nodes up
- have one node ping another
- 60 second idle time
- ping again
Getting the nodes to work
IP8800 configurations: setting port speed (7/17)
Detail on syntax and configurations regarding port speed: wiki:Documentation/OpenFlow/CLISetup
The ideal is for the nodes to negociate to 1Gbps on the Control and Data VLANs, and 10Mbs on the CM. For some reason, the nodes sometimes negociated to 100Mbs. Forcing the ports to 1Gbps with autonegotiation only caused to ports to shut down when the nodes negotiated to 100Mbps. Ultimately the ports were left configured to speed auto.
spanning tree
Spanning tree can be disabled with the command
no spanning-tree
at the configuration prompt. Another similar protocol for VLANS, per-VLAN sanning tree plus (PVST+) is started automatically whenever VLANs are created. reference on PVST+: http://www.javvin.com/protocol/PVST+.html PVST+ seems to seriously disrupt communication between the nodehandler and agent, so it was disabled on the switch.
(config)# no spanning-tree vlan 3
!(config)# no spanning-tree vlan 27
!(config)# no spanning-tree vlan 28
NOX (8/6)
Writing a controller by tying together the functional code defining OpenFlow Protocol using Ruby turned out to be a pretty messy task. According to the NOX developers, it would be better to do some Python development on the NOX web-API to expose functionality that can then be called using Ruby.
So enter NOX: http://noxrepo.org
(Borrowing heavily from the noxrepo instructions: http://noxrepo.org/manual/installation.html setup) Install with git:
apt-get install git-core   # if you don't have git installed
git clone git://noxrepo.org/noxcore
cd noxcore/
./boot.sh
mkdir build/
cd build/
../configure --with-python=yes
make
make check
Installing NOX on the Console
Simply following the above installation steps caused the Console to yell at us about things not being installed. For it to build properly, the following had to be installed:
- libtool
- libboost1.35-dev
- apache2
- libxerces-c28
- libxerces-c2-dev
- libssl-dev
- libsqlite3-dev
- python-simplejson
As of now, failing a test:
make[4]: Entering directory `/root/noxcore/build/src'
echo "#! /bin/bash" >> nox.test.tmp
echo "exec ./nox_core tests" >> nox.test.tmp
chmod a+x nox.test.tmp
mv nox.test.tmp nox.test
NOX 0.5.0~full~beta (nox_core), compiled Aug  6 2009 16:18:54
Compiled with OpenFlow 0x97 (exp)
00001|sqlite3-impl|WARN:Transactional storage file not given in the command line; defaulting to 'testing.sqlite'
00002|nox|ERR:Cannot change the state of 'tests' to INSTALLED:
'tests' has an unmet dependency:
	'webservice' has an unmet dependency:
		'webauth' has an unmet dependency:
			'webserver' ran into an error:
				cannot import a Python module 'nox.webapps.webserver.webserver':
				Traceback (most recent call last):
				  File "./nox/webapps/webserver/webserver.py", line 24, in <module>
				    from twisted.web import static, server, resource
				ImportError: No module named web

FAIL: nox.test
====================================
1 of 1 test failed
Please report to contact@noxrepo.org
====================================
make[4]: *** [check-TESTS] Error 1
make[4]: Leaving directory `/root/noxcore/build/src'
make[3]: *** [check-am] Error 2
make[3]: Leaving directory `/root/noxcore/build/src'
make[2]: *** [check-recursive] Error 1
make[2]: Leaving directory `/root/noxcore/build/src'
make[1]: *** [check] Error 2
make[1]: Leaving directory `/root/noxcore/build/src'
make: *** [check-recursive] Error 1
nox_core is found under noxcore/build/src/.
./nox_core -h will give you all the commands available. The switch will recognize a controller with the command
./nox_core -i ptcp:6633
NOX also includes, among other things, a python-based L2 switch, which can be run like this:
./nox_core -v -i ptcp:6633 pyswitch
The timeout for the flows are about 22 seconds, very quick compared to the OF reference system.
sw-sb09> showflow detail
--------------------------------------------------------------------------------
Matching key
  Input port  : 26                    VLAN ID     : 65535(0xffff)
  MAC SA      : 00:0f:ea:83:a0:5c     MAC DA      : 00:0f:ea:84:9b:30
  TYPE        : 0x800[IP]             IP protocol : 1[ICMP]
  IP SA       : 192.168.1.2/32        IP DA       : 192.168.1.1/32
  Source port : 8(0x8)                Dest port   : 0(0)
Information
  Idle timeout: 5 sec                 Hard timeout: 0 sec
  Priority    : 65535
  IFP slice no: 15                    IFP entry no: 1
  Packet count: 17                    Byte count  : 98
  Created     : Sat Feb 26 22:56:23 2000
  Expires     : Sat Feb 26 22:56:45 2000
  Action type : 0[OUTPUT]             Max length  : 0
                                      Output port : 25(0x19)
--------------------------------------------------------------------------------
SNMP (8/13)
Simple Network Management Protocol (SNMP) can be used to get information and configure network devices remotely. The protocol uses management information bases (MIBs), which store information about what can be looked up using SNMP in a tree-like hierarchy (a MIB tree), in order to look up information. Each piece of information has a unique identifier (OID) that denotes which part of the MIB tree they belong in. Information can be pulled up using the OID or their human-readable name (i.e. the administrator-designated status of ports, 1.3.6.1.2.1.2.2.1.7 or ifAdminStatus)
With respect to SB9
SB9 is set up to be the manager device for sw-sb09. The switch is configured with an ACL that allows SB9 to access and modify information via SNMP (configuration details here).
retrieving information
syntax : snmpget|snmpwalk [options] [agent IP/name] [OID]
snmpget retireves a single piece of information. snmpwalk retrieves a whole set of information by calling getnext repeatedly. You only need read access to the switch to see the information.
for example,
root@sb9:~# snmpwalk -v 2c -c netadmin 172.16.100.10 1.3.6.1.2.1.1
returns
SNMPv2-MIB::sysDescr.0 = STRING: ALAXALA AX3640S AX-3640-48T2XW-L [AX3640S-48T2XW] Switching software Ver. 10.7 [OS-L3L]
SNMPv2-MIB::sysObjectID.0 = OID: SNMPv2-SMI::enterprises.21839.1.2.11
DISMAN-EVENT-MIB::sysUpTimeInstance = Timeticks: (26201570) 3 days, 0:46:55.70
SNMPv2-MIB::sysContact.0 = STRING:
SNMPv2-MIB::sysName.0 = STRING: sw-sb09
SNMPv2-MIB::sysLocation.0 = STRING:
SNMPv2-MIB::sysServices.0 = INTEGER: 78
snmpget follows the identical syntax, but you must specify a single specific parameter, i.e. the status of just one port:
snmpget -v 2c -c netadmin 172.16.100.10 1.3.6.1.2.1.2.2.1.7.3
IF-MIB::ifAdminStatus.3 = INTEGER: up(1)
trying to get a block of info like with snmpwalk will just give you errors:
snmpget -v 2c -c netadmin 172.16.100.10 1.3.6.1.2.1.2.2.1.7
IF-MIB::ifAdminStatus = No Such Instance currently exists at this OID
setting information
setsnmp [options] [agent IP/name] [OID] [datatype] [data value] - lets you change the status of a MIB value, given you belong in the access list granted with snmp read/write permissions on the switch.
the syntax here is not much different here. Here, port 0/1 is manually shut down via snmp:
snmpset -v 2c -c netadmin 172.16.100.10 1.3.6.1.2.1.2.2.1.7.10 i 2
IF-MIB::ifAdminStatus.10 = INTEGER: down(2)
for a more detailed look, the tutorial: http://net-snmp.sourceforge.net/wiki/index.php/TUT:snmpset
Using Ruby scripts
libsnmp reference: http://snmplib.rubyforge.org/doc/index.html
Ruby has libsnmp-ruby, a library for SNMP, available. SB9 didn't come with it, so it was installed:
apt-get install libsnmp-ruby
A messy irb test of the library:
irb(main):002:0> require 'snmp'
irb(main):004:0> agent_hostname = "172.16.100.10"
=> "172.16.100.10"
irb(main):005:0> agent_comm = "NET"
=> "NET"
irb(main):007:0> s = SNMP::Manager.new(:Host => agent_hostname, :Community =>agent_comm, :Port => 161)
=> #<SNMP::Manager:0xb79d5d98 @snmp_version=:SNMPv2c, @port=161, @transport=#<SNMP::UDPTransport:0xb79d5d5c @socket=#<UDPSocket:0xb79d5d34>>, @write_community="NET", @host="172.16.100.10", @retries=5, @community="NET", @mib=#<SNMP ... #this goes on for a while
irb(main):009:0> response = s.get(["1.3.6.1.2.1.1.1.0"])
=> #<SNMP::Response:0xb79c2d10 @error_index=0, @error_status=0, @request_id=856260869, @varbind_list=[#<SNMP::VarBind:0xb79c2900 @value="ALAXALA AX3640S AX-3640-48T2XW-L [AX3640S-48T2XW] Switching software Ver. 10.7 [OS-L3L]", @name=[1.3.6.1.2.1.1.1.0]>]>
irb(main):035:0> rstring = "#{response.varbind_list.to_s}"
=> "[name=1.3.6.1.2.1.1.1.0, value=ALAXALA AX3640S AX-3640-48T2XW-L [AX3640S-48T2XW] Switching software Ver. 10.7 [OS-L3L] (OCTET STRING)]"
Attachments (1)
- wiresharkscreen.png (147.4 KB ) - added by 15 years ago.
Download all attachments as: .zip